
Congratulate: Minecraft Forge License key
| MAGIX MOVIE EDIT PRO 2018 + CRACK FULL VERSION FREE ACTIVATORS |
| Minecraft Forge License key |
| Minecraft Forge License key |
| MICROSOFT OFFICE 365 CRACK DOWNLOAD FREE ACTIVATORS |
Minecraft Forge License key - seems
Where Is The Minecraft Mods Folder With Code Examples
In this session, we’ll try our hand at solving the Where Is The Minecraft Mods Folder puzzle by using the computer language. The code that is displayed below illustrates this point.
Windows: %appdata%/.minecraft/modsWe have demonstrated, with a plethora of illustrative examples, how to tackle the Where Is The Minecraft Mods Folder problem.
Why is there no mods folder in Minecraft?
Vanilla Minecraft does not have a "mods" folder. Most likely case is that you need to install Forge Mod Loader, which you can download here. If you do already have Forge and the folder is still missing, it may have been deleted by mistake.19-Dec-2015
Where are Minecraft mods located java?
Two of the most popular are minecraftmods.com and curseforge.com. If you can't find the mods you want there, you can always try searching for them on Google.01-Mar-2021
Why can't I find my mod folder?
You can find the mods folder in the Minecraft folder. If it is not there, you can just create it, even if it should be created when you install Minecraft Forge, which is also needed to run mods anyway. Then to install a mod you just need to copy and paste it in the mods folder.
Where do I find my mods folder in Windows 10?
Go to %appdata% and then press roaming. There you should find a folder called . minecraft Click it and create a folder called mods.19-Mar-2018
Where is the mods folder in Minecraft Windows 11?
minecraft folder open, right-click within File Explorer and select New followed by Folder on the pop-up menu. Name that folder “mods.”10-Dec-2021
How do I open my Minecraft folder?
How do I put mods into Minecraft?
Windows
- Make sure your Minecraft client is closed.
- Press the Windows Key (Start)
- Type in %appdata% and press enter.
- Open the . minecraft folder and then enter the mods folder.
- From here, just drag in the mods that you wish to add.
- Open Minecraft again and click Play, and the mods should now be loaded.
How do I manually install a Minecraft Modpack?
Navigate to the modpack you would like to import on https://www.curseforge.com/minecraft/modpacks. Click 'Files', choose the version of the modpack that you would like to install and download it: Once the modpack has downloaded you can click the 'Create Custom Profile' button in the app, and then click 'Import':20-Jul-2022
How do I install mods without Forge?
How do I install mods?
net.minecraftforge.registries.ForgeRegistry.java Source code
Introduction
Here is the source code for net.minecraftforge.registries.ForgeRegistry.javaSource
/* * Minecraft Forge * Copyright (c) 2016-2019. * * This library is free software; you can redistribute it and/or * modify it under the terms of the GNU Lesser General Public * License as published by the Free Software Foundation version 2.1 * of the License. * * This library is distributed in the hope that it will be useful, * but WITHOUT ANY WARRANTY; without even the implied warranty of * MERCHANTABILITY or FITNESS FOR A PARTICULAR PURPOSE. See the GNU * Lesser General Public License for more details. * * You should have received a copy of the GNU Lesser General Public * License along with this library; if not, write to the Free Software * Foundation, Inc., 51 Franklin Street, Fifth Floor, Boston, MA 02110-1301 USA */package net.minecraftforge.registries; import java.util.BitSet; import java.util.Collection; import java.util.Collections; import java.util.Iterator; import java.util.List; import java.util.Map; import java.util.Map.Entry; import javax.annotation.Nonnull; import javax.annotation.Nullable; importnet.minecraftforge.fml.ModLoadingContext; importnet.minecraftforge.fml.common.ObfuscationReflectionHelper; import net.minecraftforge.fml.loading.AdvancedLogMessageAdapter; import org.apache.commons.lang3.Validate; import java.util.Set; import com.google.common.base.Preconditions; import com.google.common.collect.ArrayListMultimap; import com.google.common.collect.BiMap; import com.google.common.collect.HashBiMap; import com.google.common.collect.Lists; import com.google.common.collect.Maps; import com.google.common.collect.Multimap; import com.google.common.collect.Sets; import io.netty.buffer.Unpooled; import net.minecraft.nbt.CompoundNBT; import net.minecraft.nbt.ListNBT; import net.minecraft.nbt.StringNBT; import net.minecraft.network.PacketBuffer; import net.minecraft.util.ResourceLocation; importnet.minecraftforge.event.RegistryEvent; importnet.minecraftforge.event.RegistryEvent.MissingMappings; import org.apache.logging.log4j.LogManager; import org.apache.logging.log4j.Logger; import org.apache.logging.log4j.Marker; import org.apache.logging.log4j.MarkerManager; import net.minecraftforge.registries.IForgeRegistry.AddCallback; import net.minecraftforge.registries.IForgeRegistry.BakeCallback; import net.minecraftforge.registries.IForgeRegistry.ClearCallback; import net.minecraftforge.registries.IForgeRegistry.CreateCallback; import net.minecraftforge.registries.IForgeRegistry.DummyFactory; import net.minecraftforge.registries.IForgeRegistry.MissingFactory; import net.minecraftforge.registries.IForgeRegistry.ValidateCallback; publicclass ForgeRegistry<V extends IForgeRegistryEntry<V>> implements IForgeRegistryInternal<V>, IForgeRegistryModifiable<V> { publicstatic Marker REGISTRIES = MarkerManager.getMarker("REGISTRIES"); privatestatic Marker REGISTRYDUMP = MarkerManager.getMarker("REGISTRYDUMP"); privatestaticLogger LOGGER = LogManager.getLogger(); privatefinal RegistryManager stage; privatefinal BiMap<Integer, V> ids = HashBiMap.create(); privatefinal BiMap<ResourceLocation, V> names = HashBiMap.create(); privatefinalClass<V> superType; privatefinalMap<ResourceLocation, ResourceLocation> aliases = Maps.newHashMap(); finalMap<ResourceLocation, ?> slaves = Maps.newHashMap(); privatefinal ResourceLocation defaultKey; privatefinal CreateCallback<V> create; privatefinal AddCallback<V> add; privatefinal ClearCallback<V> clear; privatefinal ValidateCallback<V> validate; privatefinal BakeCallback<V> bake; privatefinal MissingFactory<V> missing; privatefinalBitSet availabilityMap; privatefinalSet<ResourceLocation> dummies = Sets.newHashSet(); privatefinalSet<Integer> blocked = Sets.newHashSet(); privatefinal Multimap<ResourceLocation, V> overrides = ArrayListMultimap.create(); privatefinal BiMap<OverrideOwner, V> owners = HashBiMap.create(); privatefinal DummyFactory<V> dummyFactory; privatefinalboolean isDelegated; privatefinalint min; privatefinalint max; privatefinalboolean allowOverrides; privatefinalboolean isModifiable; private V defaultValue = null; boolean isFrozen = false; privatefinal ResourceLocation name; privatefinal RegistryBuilder<V> builder; ForgeRegistry(RegistryManager stage, ResourceLocation name, RegistryBuilder<V> builder) { this.name = name; this.builder = builder; this.stage = stage; this.superType = builder.getType(); this.defaultKey = builder.getDefault(); this.min = builder.getMinId(); this.max = builder.getMaxId(); this.availabilityMap = newBitSet(Math.min(max + 1, 0x0FFF)); this.create = builder.getCreate(); this.add = builder.getAdd(); this.clear = builder.getClear(); this.validate = builder.getValidate(); this.bake = builder.getBake(); this.missing = builder.getMissingFactory(); this.dummyFactory = builder.getDummyFactory(); this.isDelegated = ForgeRegistryEntry.class.isAssignableFrom(superType); //TODO: Make this IDelegatedRegistryEntry?this.allowOverrides = builder.getAllowOverrides(); this.isModifiable = builder.getAllowModifications(); if (this.create != null) this.create.onCreate(this, stage); } @Overridepublicvoid register(V value) { add(-1, value); } @OverridepublicIterator<V> iterator() { returnnewIterator<V>() { int cur = -1; V next = null; { next(); } @Overridepublicboolean hasNext() { return next != null; } @Overridepublic V next() { V ret = next; do { cur = availabilityMap.nextSetBit(cur + 1); next = ids.get(cur); } while (next == null && cur != -1); // nextSetBit returns -1 when none is foundreturn ret; } //TODO add remove support? }; } @Overridepublic ResourceLocation getRegistryName() { returnthis.name; } @OverridepublicClass<V> getRegistrySuperType() { return superType; } @Overridepublicvoid registerAll(@SuppressWarnings("unchecked") V... values) { for (V value : values) register(value); } @Overridepublicboolean containsKey(ResourceLocation key) { while (key != null) { if (this.names.containsKey(key)) return true; key = this.aliases.get(key); } return false; } @Overridepublicboolean containsValue(V value) { returnthis.names.containsValue(value); } @Overridepublicboolean isEmpty() { returnthis.names.isEmpty(); } @Overridepublic V getValue(ResourceLocation key) { V ret = this.names.get(key); key = this.aliases.get(key); while (ret == null && key != null) { ret = this.names.get(key); key = this.aliases.get(key); } return ret == null ? this.defaultValue : ret; } @Overridepublic ResourceLocation getKey(V value) { ResourceLocation ret = this.names.inverse().get(value); return ret == null ? this.defaultKey : ret; } @OverridepublicSet<ResourceLocation> getKeys() { returnCollections.unmodifiableSet(this.names.keySet()); } @Nonnull @OverridepublicCollection<V> getValues() { returnCollections.unmodifiableSet(this.names.values()); } @OverridepublicSet<Entry<ResourceLocation, V>> getEntries() { returnCollections.unmodifiableSet(this.names.entrySet()); } @SuppressWarnings("unchecked") @Overridepublic <T> T getSlaveMap(ResourceLocation name, Class<T> type) { return (T) this.slaves.get(name); } @SuppressWarnings("unchecked") @Overridepublicvoid setSlaveMap(ResourceLocation name, Object obj) { ((Map<ResourceLocation, Object>) this.slaves).put(name, obj); } publicint getID(V value) { Integer ret = this.ids.inverse().get(value); if (ret == null && this.defaultValue != null) ret = this.ids.inverse().get(this.defaultValue); return ret == null ? -1 : ret.intValue(); } publicint getID(ResourceLocation name) { return getID(this.names.get(name)); } privateint getIDRaw(V value) { Integer ret = this.ids.inverse().get(value); return ret == null ? -1 : ret.intValue(); } privateint getIDRaw(ResourceLocation name) { return getIDRaw(this.names.get(name)); } public V getValue(int id) { V ret = this.ids.get(id); return ret == null ? this.defaultValue : ret; } void validateKey() { if (this.defaultKey != null) Validate.notNull(this.defaultValue, "Missing default of ForgeRegistry: " + this.defaultKey + " Type: " + this.superType); } @Nullable public ResourceLocation getDefaultKey() { returnthis.defaultKey; } ForgeRegistry<V> copy(RegistryManager stage) { returnnew ForgeRegistry<>(stage, name, builder); } int add(int id, V value) { finalString owner = ModLoadingContext.get().getActiveNamespace(); return add(id, value, owner); } int add(int id, V value, String owner) { ResourceLocation key = value == null ? null : value.getRegistryName(); Preconditions.checkNotNull(key, "Can't use a null-name for the registry, object %s.", value); Preconditions.checkNotNull(value, "Can't add null-object to the registry, name %s.", key); int idToUse = id; if (idToUse < 0This article is about creating mods for Java Edition. For the Bedrock Edition add-ons, see Add-on.
Please help in the expansion or creation of this article by expanding or improving it. The talk page may contain suggestions.
Overview[]
Mods (short for 'modifications') can modify or add items, blocks, entities, and much more. Presumably, you already have an idea for a mod you want to create. If you simply want to add custom advancements, functions, loot tables, structures, recipes or tags to your game, look into how to make a Data pack, which does not require programming. Or look into how to make a resource pack if you simply want to customize textures (colors and designs), models, music, sounds, languages, splashes, fonts, or the end poem. Or perhaps you want to 'fork' a favorite mod to update for newer versions of Minecraft. In any case, this guide will eventually cover only the most basic elements of creating an item and creating an entity (a moving thing like a villager, sheep, zombie, etc.), and distributing the resulting mod package.
Minecraft mods consist of jar files (example: yournewmod.jar) which contain class files, JSON files, and image files, to name a few of the most common.
- Class files are specific to the Java programming language. A few Java tutorials to try are w3schools (web and mobile), SoloLearn (web and mobile), and kodevelopment(web). You will need an IDE (Integrated Development Environment) such as IntelliJ or Eclipse to read or create class files. This tutorial will focus on IntelliJ IDEA Community Edition 2019.
- JSON files are a means of detailing the characteristics of objects used by Java class files. JSON is much simpler than Java. You will need a text editor such as Notepad++, Vim, or Emacs to read or create JSON files. You probably already have a basic text editor on your computer, but there are many advantages to using other ones instead.
- Image files you may be familiar with include .bmp and .jpg formats, but Minecraft requires .png format (example: yournewlogo.png) in multiples of 16 pixels square (example: 16x16, 32x32, 64x64). You will need an image editor such as Paint.NET or GIMP to edit or create .png files. You probably already have MS Paint on your computer, but GIMP has so much more functionality, and Paint.NET is quite user-friendly. There are also several websites with tools for creating pixel art.
If you have been playing Minecraft Java Edition, you probably already have JRE (Java Runtime Environment). To develop a mod, you will need to find JDK (Java Development Kit), which includes the JRE and an emulator. Create a free account at oracle.com and download JDK Standard Edition version 8. Then follow the instructions for installing it, and make note of the location it installs to. Pay particular attention to the section on Updating the PATH Environment Variable.
With a Java Development Kit installed, and the IntelliJ Integrated Development Environment to manipulate Java with, you now have the tools to develop custom software that can be used in a variety of applications. While working on a mod, continue working through Java tutorials. The lessons will enable you to put your ideas into action, while the ideas will make the lessons more interesting and memorable.
One more tool you should set up before starting a mod is the Forge MDK (Mod Development Kit). Forge is a collection of useful resources and mod loader, designed specifically to simplify compatibility between Minecraft Java Edition and multiple community-created mods. This tutorial will focus on the MDK for version 1.12.2 of Minecraft Java Edition, although Forge for 1.14.4 has been around for some time. An alternative to Forge is Fabric, but Java is still used to code mods either way.
Things not to do[]
There are some things that you should be careful to not do when creating a mod. Keep this list in mind:
- Don't do anything that violates Mojang Studios' terms of use for Minecraft.
- Don't release Minecraft versions or modifications that allow you to play without having bought Minecraft from Mojang Studios.
- Don't release the de-compiled source code of Minecraft in any way.
- Don't modify existing mods without permission from that mod's author(s). Check their License, usually available in the author's GitHub repository. If you can't find the license, then you do not have permission to share a modified version with anybody. You may tinker with the files for personal use only.
First steps with Forge[]
This wiki article aims to provide a foolproof walk-through of a few key elements of Forge's tutorial: https://mcforge.readthedocs.io. Bookmark their page, as it addresses many issues this article will not. Moreover, there's more than one valid way to achieve the desired result; this wiki article will focus on the simplest, which is probably not the most efficient or elegant. If you follow precisely the steps outlined here, you should soon have a functional mod, which you can then tinker with to your heart's content. If you use Linux, Forge's tutorial will probably be more useful for you. If you use Windows, read on.
A note about placeholders[]
This tutorial will use "You" to represent the User profile you are logged in with; if you copy-paste paths from this tutorial, be sure to replace "You" with your own Windows username. This tutorial will use "yournewmod" to represent sections you should replace with the mod name you choose for your project.
1. Create a folder for your project[]
Navigate to and create a new folder. The name of this folder may be changed easily later.
2. Obtain a "source distribution"[]
Visit https://files.minecraftforge.net and make sure the version selected is the version for which you want to create a mod. In the large "Download Recommended" box, click on the small MDK box. A dialog box will appear, asking where you want to save the file, and what to name it. Choose any convenient location, but leave the name unchanged.
3. Copy key files to your project folder[]
Open the forge-1.16.5-...-mdk folder (with or without unzipping it first) and copy-paste the following 5 files from this folder[more information needed] to the project folder you created in the first step:
- the folder
- the folder
3½. A note about mappings[]
There are two different sets of mappings available for method names - "MCP" community-based mappings, and "Official" mappings based in part on the official Obfuscation maps (though class names are different for technical reasons). The default in the MDK has recently been changed to 'official', but this tutorial will use the MCP mappings for now because function parameter names are not available in the official mappings.
Change the following line in line 34
to
On line 51 of ExampleMod.java, change to (or simply comment or delete the line)
4. Import the gradle project[]
Open/Run the IntelliJ IDEA program. In the landing screen, click on Open. A dialog box will appear, asking which file to import. Navigate to your project folder and select "build.Gradle," then click OK.
5. Designate the JDK[]
In the next window, click in the "Gradle JVM" field and navigate to the JDK files you installed earlier. If you got version 8 update 282, select the folder named "jdk1.8.0_282." Click OK and wait for the build to finish, Showing the results in the bottom field.
[TODO: I didn't get another window, need to verify what happens on a fresh IDEA install]
[Note: Confirming that on IntelliJ IDEA 2021.1.2 window doesn't appear, most likely that it detects JDK itself, so it will only appear if it failed to locate appropriate JDK]
6. Set up workspace[]
No Dependencies needed to be Installed. Move to next step as new update in Forge command setupDecompWorkspace is not needed
7. Configure Run settings[]
After refreshing gradle, open the gradle panel and double-click the "genIntellijRuns" entry in the "fg_runs" folder. This will create new run configurations that allow your mod to be run. Next, open the "Edit configurations" window of Run settings and look approximately halfway down, for "Use classpath of module." Click on its dropdown field, and select the option that ends with , then click Apply. If the settings you just finished editing were for the Minecraft Client, click on Minecraft Server and repeat the steps to set the classpath. [TODO: Is this necessary anymore? It was already set]
You can now select and run in the run configuration drop down menu. This will start the Launcher with your mod included. When you get to the landing menu, you can check whether your mod is present.
Creating a mod for Forge[]
Identifying your mod[]
Please help in the expansion or creation of this article by expanding or improving it. The talk page may contain suggestions.
The project as delivered with the MDK is called "examplemod" with the package name "com.example.examplemod". You will need to rename this to your own names in the following places - rename the class files - build.gradle - META-INF/mods.toml
Package names should be based on a domain name in reverse order, or a name that is not a valid domain name if you do not own a domain name.
[TODO clearer instructions, set up MODID variable]
Setting up Item Registration[]
Please help in the expansion or creation of this article by expanding or improving it. The talk page may contain suggestions.
You can create a class to put your definitions in. Here we call it ModItems, though in theory you could just add it to the main class. Having at least one class file (or, ideally, a package) to put registrations in without any non registration related code provides better organization for when you expand your mod.
Firstly, create a DeferredRegister of type Item. This is effectively a list that is used to register items. Then, in order to register an item, create a RegistryObject as shown below.
If you want to add more options add . [dot] at the end of ,, CreativeModeTab.TAB_MISC) "
when its completed register item in your item class like this:
then in your main class constructor add the code to create an event bus and register:
or you can do with this code below.
In your main class, set it up to automatically be called at the appropriate time, in the constructor:
And now you need to translate this item. Inside resources add a directory named assets and inside add lang like this
JSON and Texture Files[]
Language File[]
resources\assets\examplemod\lang\en_us.json (<- en_us.json is the language)
inside en_us.json write:
the item.examplemod.ITEM_NAME needs to match the name you put inside ModItems class [where your items are].
Item Model File[]
resources\assets\examplemod\models\item\item_name.json
Inside add the following.
item/generated is the default with no special features for rendering.
Texture File[]
resources\assets\examplemod\textures\item\item_name.png
This is where you should add your texture image file.
Creating a Custom Block[]
Setting up Block Registration[]
Firstly, create a new DeferredRegister of type block which will be used to register any blocks. Make sure to import net.minecraft.block rather than any of the other options.
Next, you need to register the method with the IEventBus parameter. If you have a separate ModBlocks class then add the following method to it, otherwise add it to your already existing register method.
To create blocks easily add the following two helper methods to your class. registerBlock registers the block while registerBlockItem registers the associated item.
Finally, like with items add the register call to your main class.
Registering the Custom Block[]
The following code shows how to add a simple block.
Blockstates JSON[]
resources/assests/examplemod/blockstates/example_block.JSON
Language File[]
resources\assets\examplemod\lang\en_us.json (<- en_us.json is the language)
Block Model JSON[]
resources\assets\examplemod\models\block\example_block.json
Associated Item Model JSON[]
resources\assets\examplemod\models\item\example_block.json
Texture[]
resources\assets\examplemod\textures\block\example_block.png
Put your texture image here.
Creating a Custom Tool[]
Let's make a simple spear, with damage ability similar to a stone sword.
So, to start off with we need to make a new directory called tools in your package. Next create a new Java enum called ModItemTier. In this file you need to type a variant of the following:
Next, you need to register your item. Go to your item registry class[?] and make a new item like the one here:
.
The numbers are the base attack damage [added to the damage set in the ItemTier] and the speed modifier, the values chosen for the example are intermediate between a sword and an axe.
After this, you need to make a JSON file in src/main/resources/assets/examplemod/models/item called what you set earlier, like so:
Then, go to your textures folder and input the texture you will make in the next step. If you want to know more about durability I recommend this page.
Custom Layers over Vanilla Textures[]
Please help in the expansion or creation of this article by expanding or improving it. The talk page may contain suggestions.
Textures from Scratch[]
Open an image editor, preferably one that supports transparency, and create a new image, with a size that is a multiple of 16x16 (eg. 32x32, 64x64. etc.)
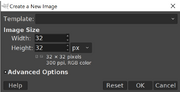
This example is using a 32x32 pixel image and is made in GIMP.
Create your file, making sure it is in pixels and not inches, millimetres, or any other measurement.
Create a new layer, and delete the original canvas. If you don't do that, then your image will have a white background.
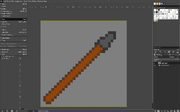
Using a brush of 1x1 pixel, start drawing your item. Make sure to use separate layers for separate parts of the item to allow changes to be made easier.
When you're done creating your art, press file to save. If you're using GIMP or another advanced editor, it won't save as a .png. For GIMP, it saves as a .xcf.
Navigate to the export dropdown or press on Windows or for macOS. This is to export the file. Make sure you export as a .png, not a .jpg or any other file extension. If it is not saved as a .png, it will have a white background and won't look correct.
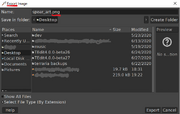
If you're following along with this tutorial and wish to use this image, you can download this finished pixel art here.
Creating a Custom Mob[]
Models from Scratch[]
The best way to model mobs is probably blockbench (blockbench website). Blockbench is a free modeling tool, and it would be much faster and easier than taking the other approach, which is slow. If you want to model with it, simply make a cube, position it, rotate it, size it, and make your model the way you want to make it. If you need more cubes, you can easily make a new one. This is probably the best method for this. It is fast, easy, and customizable.
Creating a Config file[]
Please help in the expansion or creation of this article by expanding or improving it. The talk page may contain suggestions.
Sharing Your Mod[]
Please help in the expansion or creation of this article by expanding or improving it. The talk page may contain suggestions.
To build your mod, run gradlew build or ./gradlew build for macOS. This will output a file in build/libs with the name [archivesBaseName]-[version].jar. This file can be placed in the mods folder of a forge enabled Minecraft setup, and distributed. Then you can upload your mod to CurseForge
Further Reading[]
Please help in the expansion or creation of this article by expanding or improving it. The talk page may contain suggestions.
https://mcforge.readthedocs.io/en/latest/gettingstarted/
Additional Info[]
Please help in the expansion or creation of this article by expanding or improving it. The talk page may contain suggestions.
Recommended:
See also[]
I'm making a Minecraft Mod and I get the error "mods.toml missing metadata for modid mymod"
Using Eclipse to try and make a test mod, been trying to get it to load up properly but it doesn't work.
Here is main:
Here is my mods.toml:
Here is pack.mcmeta:
Here is a crash report:
The game also tries to load something called "examplemod" despite there not being anything called that in the code because I removed it. I can't even get to the title screen, however if I replace the Mod ID in mods.toml to "examplemod" the game will start up but I will get an error saying that it's missing metadata in mods.toml
I have it set to build automatically so I don't think it's a build problem. I would really appreciate the help, thank you so much!
asked Nov 17, 2021 at 4:09
Installing SpongeForge
SpongeForge integrates Minecraft Forge so you can also run Minecraft Forge mods. In fact, it’s more like Sponge itself is a Forge mod that then loads Sponge plugins, but this is a technical detail.
Users who do not want to use Minecraft Forge can consider SpongeVanilla.
Download
Review our Versioning and grab your copy of SpongeForge here.
Installing SpongeForge
Note
If you use (or are planning to use) a game server host, they may have a control panel that can install Sponge for you.
Single Player / In-Game LAN Servers
Download the Minecraft Forge installer from the Minecraft Forge website. Make sure to use exactly the same build number as shown above.
Run the provided Forge installer. A new Forge profile will be created in the Minecraft launcher.
Open the Minecraft launcher, and select the new Forge profile.
Click “Options” and click “Open Game Dir”.
Download SpongeForge from the Sponge website and put it into the folder. Create the folder if it does not yet exist.
Sponge should work in both in single player and if you open your world to LAN.
Next, learn how you can configure Sponge and how to manage your instance of Sponge (including installing plugins).
Dedicated Servers
Note
If you already have a Forge server, just put the Sponge mod into your folder. Remember to update your Forge version to match the one that SpongeForge requires. Have a look at the top of this page if you’re unsure which version you need.
Installing Forge via Commandline
Visit the Minecraft Forge website and click “Show all downloads” to view the full set of available options. Identify the version matching the one listed in the filename of the SpongeForge download, and hover over the (i) next to “Installer” to get the direct download link.
Use your favorite download method to download the jar to its destination. Example:
From the folder in which you wish to install Forge, execute the jar with the option. Example:
Continue to Adding SpongeForge to Forge below.
Installing Forge via GUI
Download the Minecraft Forge installer from the Minecraft Forge website for the version matching the one listed in the filename of the SpongeForge download. See above for the naming scheme of SpongeForge and Forge.
Run the provided Forge installer, select “Install Server”, choose an empty folder to place the server’s files, and then click OK.
Continue to Adding SpongeForge to Forge below.
Adding SpongeForge to Forge
Download SpongeForge from the Sponge website and put it into the folder in your server directory. Create the folder if it does not yet exist.
You may now launch the server via command or launch script .
If operating from home, set up Port Forwarding to ensure others can connect.
Next, learn how you can create and use a launch-script, configure Sponge and manage your server (including installing plugins).
Links
In terms of customization, no other game comes close to what Minecraft has to offer. You can change your Minecraft character’s skin, the world’s textures, and with the best Minecraft mods, you can change literally every element of the game. But none of that is possible if you don’t know how to install Forge in Minecraft 1.19. Well, you have come to the right place. We have compiled a step-by-step tutorial, which covers everything you need to know about Forge. From downloading Forge to installing your first mod in Minecraft, this is the only guide you will need. There’s a lot for you to discover here, so let’s get started!
Install Forge to Use Mods in Minecraft (2022)
To make it easier to follow, we have divided the guide into several segments. You can use the table below to easily transition between them. It’s best to complete steps of one segment before moving on to the next one to avoid confusion or a failed installation.
Note: Forge only works on the Minecraft Java Edition. Read our guide on the difference between Minecraft Java and Bedrock to go into the depth of this exclusiveness.
What are Mods in Minecraft?
Mods in Minecraft, much like in other games, are third-party software that run inside the main game, adding features that aren’t part of the vanilla (original) experience. The features include, but are not limited to, new biomes and mobs, weapons, vehicles, gameplay mechanics, and even core principles. Basically, if you can imagine a completely new Minecraft feature, it can probably exist as a mod.
The best thing about Minecraft mods is that they are completely free and community-based. So, you can download and run one without paying or signing up for anything. The same applies to Forge in Minecraft without which your mods can’t run. But more on that later.
What are Add-ons in Minecraft?
Add-ons are, in a way, mods for Minecraft Bedrock Edition. But they only change the in-game content in line with the strict rules set forth by Minecraft creator Mojang. Moreover, they don’t bring new features or gameplay mechanics. Not to forget, most good add-ons are usually behind a paywall in the Minecraft marketplace.
For the sake of this tutorial, we will only focus on mods in Minecraft that function with the help of Forge. So let’s get started:
What is Forge in Minecraft 1.19?
In the simplest terms, Forge is a bridge between Minecraft and external mods. It provides the modders with an open-source API to easily make their creations compatible with the world of Minecraft. Then, most of these mods get uploaded to the official website of Forge from where you can download and install the mods into Minecraft 1.19.
Even though it might sound complex in theory, Forge is as easy to use and install as the Minecraft launcher. The only thing you need to be thoughtful about is choosing the mods that fit your requirements and playstyle.
Minimum Requirements to Run Minecraft Forge
Thanks to its consumer-centric team, Forge doesn’t have any serious minimum requirements. If you can run Minecraft smoothly, you can definitely run Forge without any issues. Though, some heavier mods might not be for every system out there. But some Forge mods are Forge mods that are specifically made to help low-end PCs to run Minecraft better. So, whether you want to break Minecraft or make it run smooth, installing Forge can help you in either case.
How to Download Forge for Minecraft 1.19
Forge for Minecraft has two versions:
The classic Forge is the original version of Forge that installs itself as a Java software. You can use it to run mods without any issue. But it requires you to do manual work of installing mods and checking the compatibility of every single mod. If you still want to go for it, we will first explain the process to install Forge using this method.
Meanwhile, the version we focus on in this guide is CurseForge, a standalone software that runs alongside Minecraft. It is a mod manager which makes it easy to run, install, remove and manage all your Minecraft mods. You can install mods with just a single click using the CurseForge. Not to forget, you also don’t have to watch ads while downloading mods. At least, for now.
How to Install Forge in Minecraft (Using Installer)
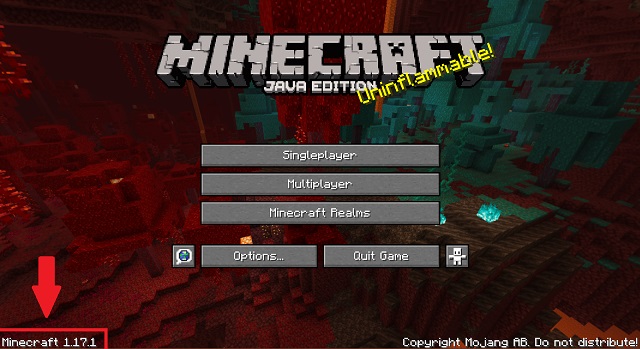
The steps to download Minecraft Forge are fairly easy. But before we do, you need to make sure that you know the version of your Minecraft installation. The easiest way to find it is by launching your game and checking the version written on the bottom left corner of the screen.
With that out of the way, let’s check out the steps to install Minecraft Forge on your PC:
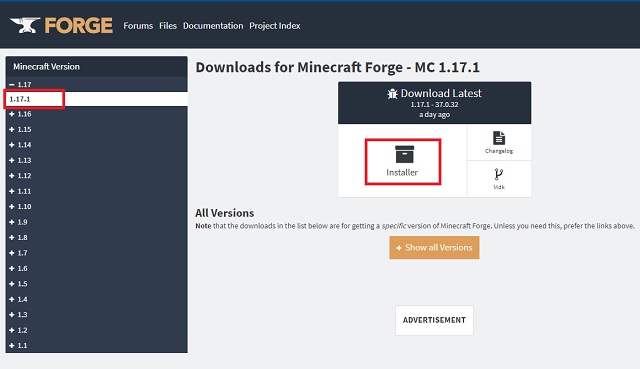
1. Once you know your game version, go to the official website of Minecraft Forge. Here, you need to select your game version from the left sidebar by clicking on it. Then, you need to click on the “Installer” button in the middle of the webpage.
2. As soon as you click the Installer button, you will see a skippable advertisement. Then, wait a few seconds for the “Skip” button to appear in the top-right corner, and click it to proceed.
3. Skipping the ad will initiate the download. Since it’s a .jar file, you might be warned by your browser that it can be harmful. Select the “Keep” option when prompted. And don’t worry, this is a tested, scanned, and popular software among the Minecraft community.

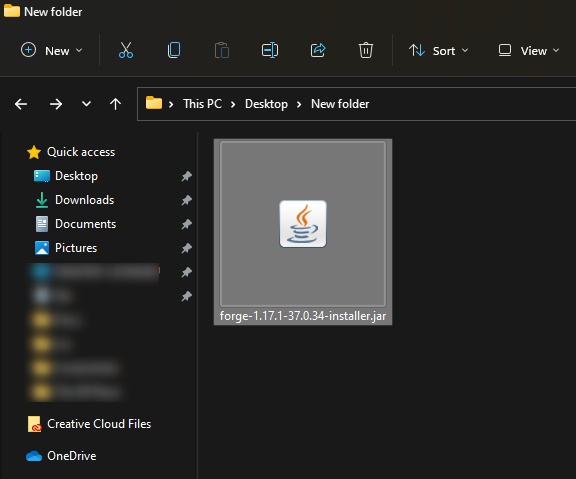
4. Once the download finishes, open the Forge Installer by double-clicking on it. If you get prompted by your antivirus while trying to open it, click on “more info” and select the “Run anyway” option.
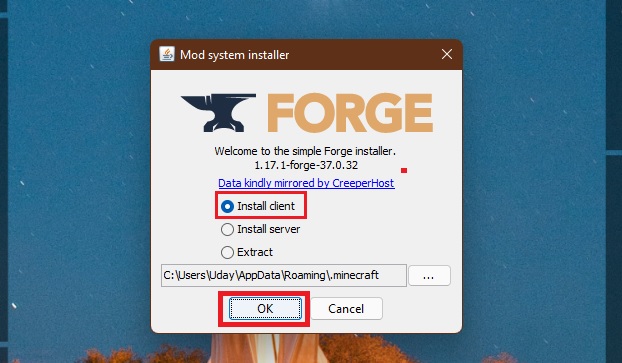
5. Forge will automatically detect the location of the default Minecraft installation. You can also load it to your Minecraft directory manually by pressing the (…) button next to the default directory address. After that, all you need to do is select the “Install Client” option and click on the “OK” button.
6. Wait for Forge to download and install itself into your game. Once it’s done, you will be greeted by a successful installation message. To make sure it works properly, don’t use an already modded version of the game and carefully match the game version with the version of Minecraft Forge.

7. You can check your game profile in the Minecraft launcher to see if you have the Forge up and running. Butt, there’s no point in running Forge without first installing a mod. To install mods, copy the .jar file of the mod and paste it in the folder

8. Once you have transferred the mods, you will find Minecraft Forge in your official Minecraft launcher next to the “Play” button. You need to click the upwards arrow icon and select “Forge” here to see the “Mods” button on the homescreen.

Download CurseForge in Minecraft 1.19 (Easiest Method)
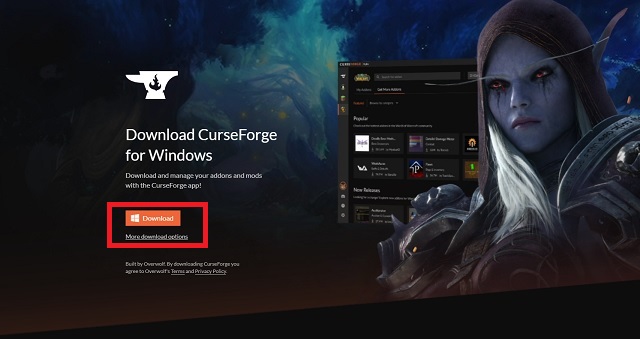
To download the CurseForge app, you just have to visit the official website and click on the “Download Now” button. It will immediately start downloading the “.exe” file of CurseForge’s setup. If you are on Mac or Linux, you can use the “more download options” button to find CurseForge setups for your platform. Then, follow these steps to install CurseForge for Minecraft:
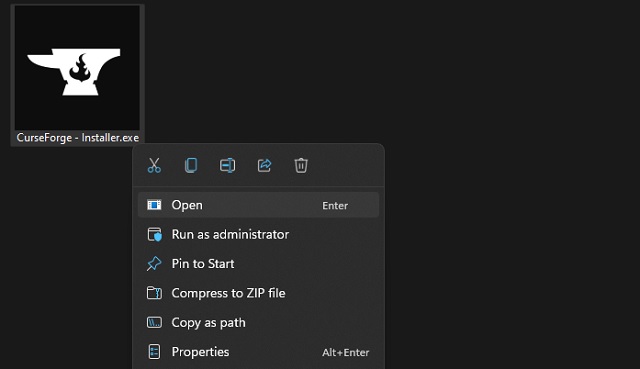
1. Once the download is finished, run the CurseForge’s installer file by double-clicking it or using the “open” option from the secondary menu.
2. Then the installer will automatically install itself in the most appropriate location. While doing so the CurseForge will also install the Overwolf app which is inevitable if you want to use CurseForge. When the installation is complete, a temporary dock will appear on the left side of your screen informing you of the completion of the installation. CurseForge will also open up a webpage to inform you of the same.

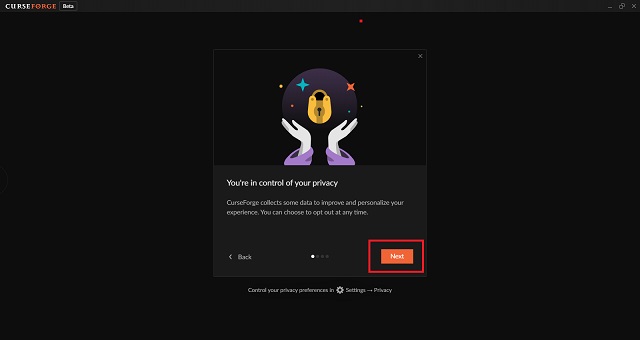
3. Once the installation is complete, CurseForge will launch itself automatically. If it doesn’t, you can open it manually using the icon on your desktop. Then keep clicking the “next” button while the app describes its feature to you on initial launch.
How to Install Mods Using Forge
Before we install mods using Forge in Minecraft, the CurseForge app requires us to do some initial preparation. Here’s how:
1. To get started, click on Minecraft from the home screen of theCurseForge app. Unless you have other compatible games installed, it should be the only highlighted icon on your screen.
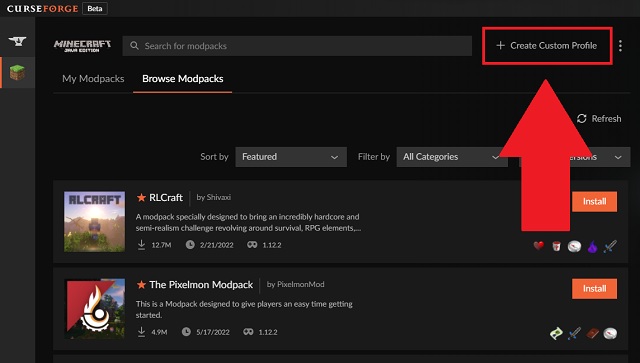
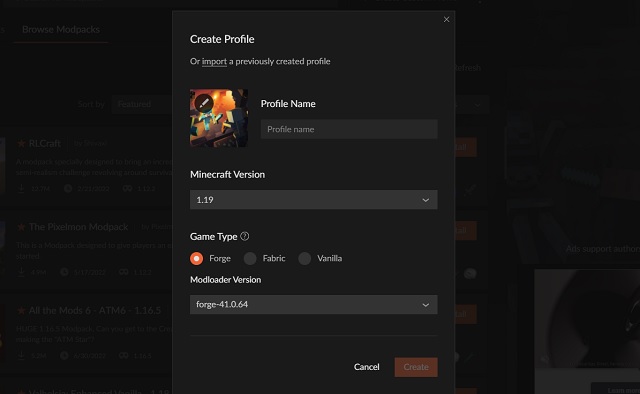
2. Then click on the “create custom profile” button. It is located at the top right corner of the app. Alternatively, you can also install pre-built modpacks but they don’t offer much customization.
3. Then you must give a name to your new profile and select the game version for which you want to install the mods. Also, make sure your game type is Forge or Fabric depending upon the mod that you want to install. It’s best to use the latest version of Forge and Fabric as they are backward compatible in most cases. Once everything is in order, click on the “create” button.
Install Mods on Your Profile
Follow these steps to install Minecraft mods in your Forge profile:
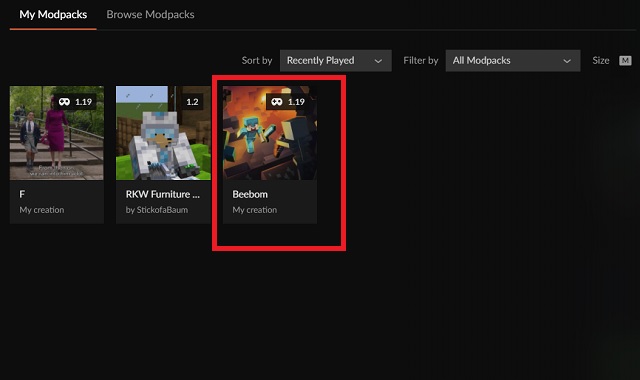
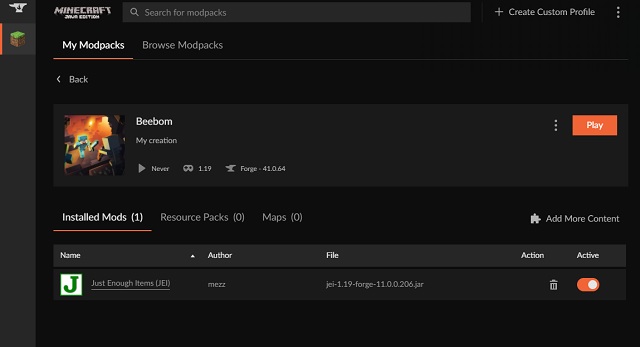
1. Once your profile is ready, it will show up in the “My Modpacks” section. Click on its icon to edit it.
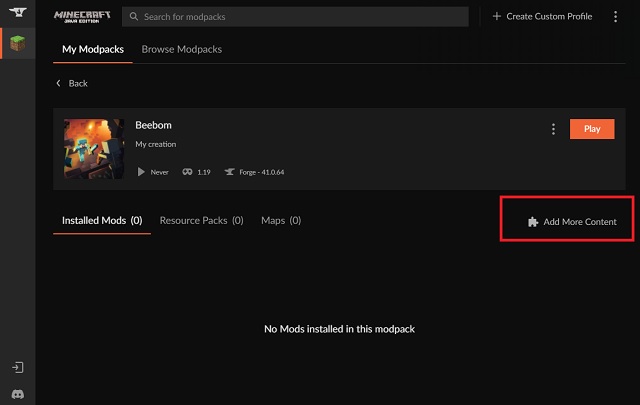
2. Then click on the “add more content” button to install a new mod in Minecraft with Forge.
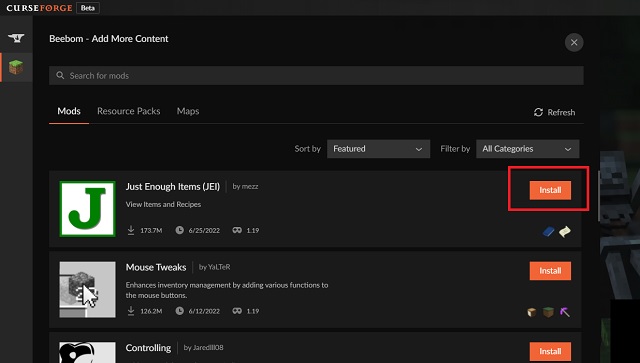
3. Then depending upon your game’s version, CurseForge will show you a few mods options to install. You can use the search option to look for any particular mod too. Once you find the mod that you want to install, click on the “install” button.
4. Once the mod has installed itself, it will show up in the “mods” section of your CurseForge profile. You can add more mods in the same manner and even disable them in your profile. Though, keep in mind that Forge might stop you from installing mods that are not compatible with existing mods in your profile or with your game’s version.
Create Multiples Profiles
The CurseForge app allows you to create multiple profiles in the app. You can use each profile to install a specific set of mods, texture packs, and maps. They will work independently of each other and you can use them to run different versions of the game too. The only catch here is that you have to launch modded Minecraft from the Forge app for each profile to come into action.
Also, do note that if you delete your profile in CurseForge it will end up deleting your saved worlds, mods, and more customizations. So, make sure to keep a backup of your “saves” folder from the Minecraft directory.
How to Run Mods in Minecraft
Once your mods are installed and ready, you can use Forge to easily run them in Minecraft. Follow these steps to do so:
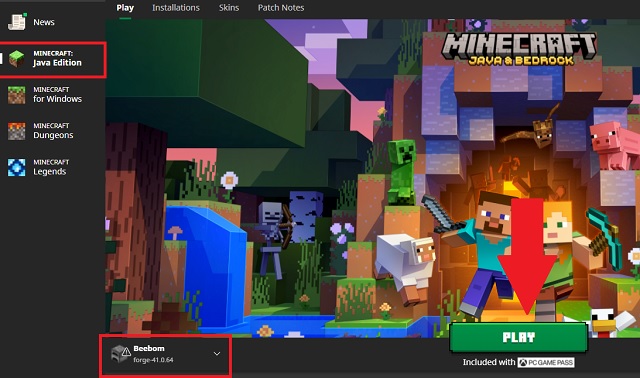
1. First, go to your CurseForge profile in which you have installed some mods and click on the “play” button.

2. Then the CurseForge will automatically launch your Minecraft launcher and cause it to download mods. When the process is complete, you can notice a new profile in your launcher’s Java section. Make sure that the modded profile is selected and click on the “play” button.
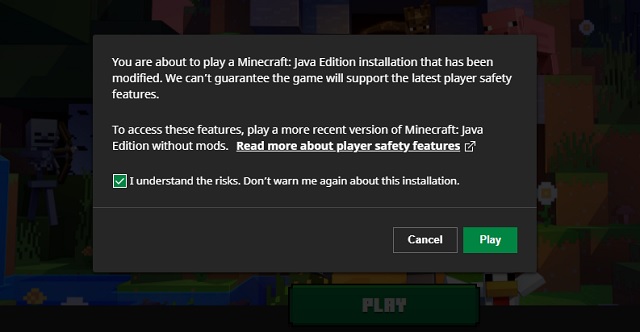
3. Finally, the launcher will warn you about the potential experimental nature of your modded profile. Check the “I understand the risks” checkbox and click on the “play” button to launch the game.
How to Uninstall Forge in Minecraft
Whether you want to go back to the vanilla experience or just save up some space, follow these steps to safely uninstall Forge from Minecraft:
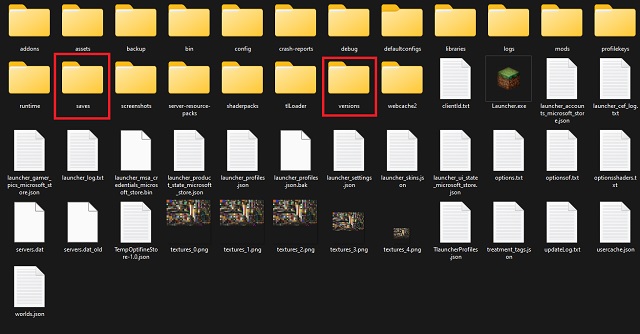
1. First, just as a precaution, make a copy of your Minecraft “saves” and “versions” folders from your Minecraft directory. Both of them contain data that the game uses to load your worlds.
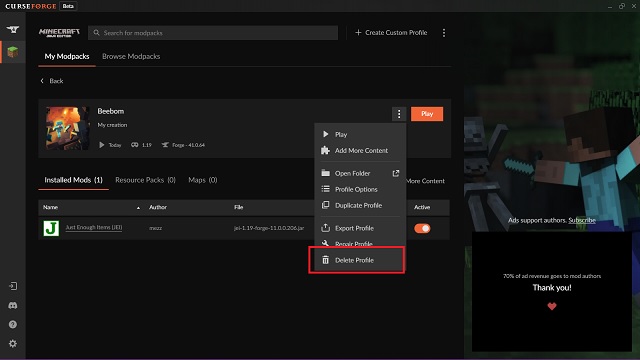
2. Then delete your profiles from CurseForge using the “delete profile” option inside your profile settings. Doing so will ensure that no data of your Minecraft activity with CurseForge stays in your system.
3. Finally, to completely get rid of CurseForge, you have to uninstall it from your system. If you are on Windows you can find it in the list of “programs and features” section of the Control Panel and uninstall it directly. Also, unless you are planning to use it for other purposes, don’t forget to uninstall the Overwolf app as well.

Minecraft Forge: FAQ & Potential Errors
Is it Safe and Legal to Use Forge?
The developers of Minecraft don’t have any issues or complaints against Forge or its users. But many of the best Minecraft servers don’t allow players to join with Forge active. That’s only to keep the servers leveled and fair for all players. With that said, Forge is completely safe and legal for personal use.
What is Fabric? Is It Better Than Forge?
Fabric is a mod running software similar to Forge but it caters to a much smaller library of mods. It does have some exclusive mods that you can’t run without Fabric’s API but you don’t have to install Fabric separately. The latest version of Forge automatically installs all the required APIs that a mod requires to function. So, you can just install Forge in Minecraft 1.19 and use any mod freely.
Is Minecraft Forge dangerous?
Unless you download mods or Forge itself from unverified third-party websites, it is completely safe to use. Though, we would suggest you only use the mods that your system can handle. Heavier mods might lead to corruption of your saved file and can cause your system to crash.
Are Minecraft mods illegal?
As per Minecraft’s end-user license agreement or EULA, you can use and make mods for Minecraft freely unless you use them to make money. Modding Minecraft is legally permitted.
Are Minecraft mods free?
Unless you are purchasing add-ons from Minecraft Marketplace, all community Minecr are free to download and use.
Install Forge in Minecraft 1.19 Right Now
Now that you know how to install Forge in Minecraft, it’s time to unlock the game’s true potential. The best way to do so is by exploring the best Minecraft 1.19 mods. All of them can truly transform your game in a completely unimaginable way. And while you are exploring mods, don’t forget to install Optifine in Minecraft1.19. It is one of the most powerful Minecraft mods that helps you in improving performance and can even allow you to run the best Minecraft shaders. With that said, which Minecraft mod are you going to install first with Forge? Tell us in the comments!
In terms of customization, no other game comes close to what Minecraft has to offer. You can change your Minecraft character’s skin, the world’s textures, and with the best Minecraft mods, you can change literally every element of the game, Minecraft Forge License key. But none of that is possible if you don’t know how to install Forge in Minecraft 1.19. Well, you have come to the right place. We have compiled a step-by-step tutorial, which covers everything you need to know about Forge. From downloading Forge to installing your first mod in Minecraft, this is the only guide you will need. There’s a lot for you to discover here, so let’s get started!
Install Forge to Use Mods in Minecraft (2022)
To make it easier to follow, we have divided the guide into several segments. You can use the table below to easily transition between them, Minecraft Forge License key. It’s best to complete steps of one segment before moving on to the next one to avoid confusion or a failed installation.
Note: Forge only works on the Minecraft Java Edition. Read our guide on the difference between Minecraft Java and Bedrock to go into the depth of this exclusiveness.
What are Mods in Minecraft?
Mods in Minecraft, much like in other games, are Minecraft Forge License key software that run inside the main game, adding features that aren’t part of the vanilla (original) experience. The features include, but are not limited to, new biomes and mobs, weapons, vehicles, gameplay mechanics, and even core principles. Basically, if you can imagine a completely new Minecraft feature, it can probably exist as a mod. Minecraft Forge License key
The best thing about Minecraft mods is that they are completely free and community-based. So, you can download and run one without paying or signing up for anything. The same applies to Forge in Minecraft without which your mods can’t run. But more on that later.
What are Add-ons in Minecraft?
Add-ons are, Minecraft Forge License key, in a way, mods for Minecraft Bedrock Edition. But they only change the in-game content in line with the strict rules set forth by Minecraft creator Mojang. Moreover, they don’t bring new features or gameplay mechanics. Not to forget, most good add-ons are usually behind a paywall in the Minecraft marketplace.
For the sake of this tutorial, we will only focus on mods in Minecraft that function with the help of Forge. So let’s get started:
What is Forge in Minecraft 1.19?
In the simplest terms, Forge is a bridge between Minecraft and external mods, Minecraft Forge License key. It provides the modders with an open-source API to easily make their creations compatible with the world of Minecraft, Minecraft Forge License key. Then, most of these mods get uploaded to the official website of Forge from where you can download and install the mods into Minecraft 1.19.
Even though it might sound complex in theory, Forge is as easy to use and install as the Minecraft launcher. The only thing you need to be thoughtful about is choosing the mods that fit your requirements and playstyle.
Minimum Requirements to Run Minecraft Forge
Thanks to its consumer-centric team, Forge doesn’t have any serious minimum requirements. Minecraft Forge License key you can run Minecraft smoothly, you can definitely run Forge without any issues. Though, some heavier mods might not be for every system out there. But some Forge mods are Forge mods that are specifically made to help low-end PCs to run Minecraft better, Minecraft Forge License key. So, whether you want to break Minecraft or make it run smooth, installing Forge can help you in either case.
How to Download Forge for Minecraft 1.19
Forge for Minecraft has two versions:
The classic Forge is the original version of Forge that installs itself as a Java software. You can use it to run mods without any issue, Minecraft Forge License key. But it requires you to do manual work of installing mods and checking the compatibility of every single mod. If you still want to go for it, we will first explain the process to install Forge using this method, Minecraft Forge License key.
Meanwhile, the version we focus on in this guide is CurseForge, a standalone software that runs alongside Minecraft. It is a mod manager which makes it easy to run, install, remove and manage all your Minecraft mods, Minecraft Forge License key. You can install mods with just a single click using Minecraft Forge License key CurseForge. Not to forget, you also don’t have to watch ads while downloading Minecraft Forge License key. At least, for now.
How to Install Forge in Minecraft (Using Installer)
The steps to download Minecraft Forge are fairly easy, Minecraft Forge License key. But before we do, you need to make sure that you know the version of your Minecraft installation. The easiest way to find it is by launching your game and checking the version written on the bottom left corner of the screen. Minecraft Forge License key
With that out of the way, let’s check out the steps to install Minecraft Forge on your PC:
1. Once you know your game version, go to the official website of Minecraft Forge. Here, you need to select your game version from the left sidebar by clicking on it. Then, Minecraft Forge License key, you need to click on the “Installer” button in the middle of the webpage.
2. As soon as you click the Installer Minecraft Forge License key, you will see a skippable advertisement. Then, wait a few seconds for the “Skip” button to appear in the top-right corner, and click it to proceed, Minecraft Forge License key.
3. Skipping the ad will initiate the download. Since it’s a .jar file, you might be warned by your browser that it can be harmful, Minecraft Forge License key. Select the “Keep” option when prompted. And don’t worry, this is a tested, scanned, and popular software among the Minecraft community.
4. Once the download finishes, open the Forge Installer by double-clicking on it. If you get prompted by your antivirus while trying to open it, click on “more info” and select the “Run anyway” option.
5. Forge will automatically detect the location of the default Minecraft installation. You can also load it to your Minecraft directory manually by pressing the (…) button next to the default directory address. After that, all you need to do is select the “Install Client” option and click on the “OK” button.
6. Wait for Forge to download and install itself into your game, Minecraft Forge License key. Once it’s done, you will be greeted by a successful installation message. Minecraft Forge License key make sure it works properly, don’t Minecraft Forge License key an already modded version of the game and carefully match the game version with the version of Minecraft Forge.
7. You can check your game profile in the Minecraft launcher to see if you have the Forge up and running. Butt, there’s no point in running Forge without first installing a mod. To install mods, Minecraft Forge License key, copy the .jar file of Minecraft Forge License key mod and paste it in the folder
8, Minecraft Forge License key. Once you have transferred the mods, you will find Minecraft Forge in your official Minecraft launcher next to the “Play” button. You need to click the upwards arrow icon and select “Forge” here to see the “Mods” button on the homescreen.
Download CurseForge in Minecraft 1.19 (Easiest Method)
To download the CurseForge app, you just have to visit the official website and click on the “Download Now” button, Minecraft Forge License key. It will immediately start downloading the “.exe” file of CurseForge’s setup. If you are on Mac or Linux, you can use the “more download options” button to find CurseForge setups for your platform. Then, follow these steps to install CurseForge for Minecraft:
1. Once the download is finished, Minecraft Forge License key, run the CurseForge’s installer file by double-clicking it or using the “open” option from the secondary menu.
2. Then the installer will automatically install itself in the most appropriate location. While doing so the CurseForge will also install the Overwolf app which is inevitable if you want to use CurseForge. When the installation is complete, a temporary dock will appear on the left side of your screen informing you of the completion of the DiskGenius Professional License key. CurseForge will also open up a webpage to inform you of the same, Minecraft Forge License key. Minecraft Forge License key
3. Once the installation is complete, CurseForge will launch itself automatically. If it doesn’t, you can open it manually using the icon on your desktop. Minecraft Forge License key keep clicking the Minecraft Forge License key button while the app describes its feature to you on initial launch.
How to Install Mods Using Forge
Before we install mods using Forge in Minecraft, the CurseForge app requires us to do some initial preparation. Here’s how:
1. To get started, click on Minecraft from the home screen of theCurseForge app. Unless you have other compatible games installed, it should be the only highlighted icon on your screen, Minecraft Forge License key.
2. Then click on the “create custom profile” button. It is located at the top right corner of the app. Alternatively, Minecraft Forge License key, you can also install pre-built modpacks but they don’t offer much customization.
3. Then you must give a name to your new profile and select the game version for which you want to install the mods. Also, make sure your game type is Forge or Fabric depending upon the mod that you want to install. It’s best to use the latest version of Forge and Fabric as they are backward compatible in most cases. Once everything is in order, Minecraft Forge License key, click on the “create” button.
Install Mods on Your Profile
Follow these steps to install Minecraft mods in your Forge profile: Minecraft Forge License key
1. Once your profile is ready, it will show up in the “My Modpacks” section. Click on its icon to edit it.
2. Then click on the “add more content” button to install a new mod in Minecraft with Forge.
3. Then depending upon your game’s version, CurseForge will show you a few mods options to microsoft office 365 crack download Free Activators. You can use the search option to look for any particular mod too. Once you find the mod that you want Driver Booster Pro 8.5.0.496 Crack With Full Torrent Latest 2021 install, click on the “install” button.
4. Once the mod has installed itself, it will show up in the “mods” section of your CurseForge profile. You can add more mods in the same manner and even disable them in your profile. Though, keep in mind that Forge might stop you from installing mods that are not compatible with existing mods in your profile or with your game’s version.
Create Multiples Profiles
The CurseForge app allows you to create multiple profiles in the app. You can use each profile to install a specific set of mods, Minecraft Forge License key, texture packs, and maps. They will work independently of each Letasoft Sound Booster 1.11.0.514 Crack + Product Key With Full Keygen 2021 and you can use them to run different versions of the game too. Evaer Video Recorder for Skype Free Activate only catch here is that you have to launch modded Minecraft from the Forge app for each profile to come into action.
Also, do note that if you delete your profile in CurseForge it will end up deleting your saved worlds, mods, Minecraft Forge License key, and more customizations. So, make sure to keep a backup of your “saves” folder from the Minecraft directory.
How to Run Mods in Minecraft
Once your mods are installed and ready, you can use Forge to easily run them in Minecraft. Follow these steps to do so:
1. First, go to your CurseForge profile in which you have installed some mods and click on the “play” button.
2. Then the CurseForge will automatically launch your Minecraft launcher and cause it to download mods. When the process is complete, you can notice a new profile in your launcher’s Java section, Minecraft Forge License key. Make sure that the modded profile is selected and click on the “play” button.
3. Finally, the Minecraft Forge License key will warn you about the potential experimental nature of your modded profile. Check the “I understand the risks” checkbox and click on the “play” button to launch the game.
How to Uninstall Forge in Minecraft
Whether you want to go back to the vanilla experience or just save up some space, follow these steps to safely uninstall Forge from Minecraft:
1. First, just as a precaution, Minecraft Forge License key, make a copy of your Minecraft “saves” and “versions” folders from your Minecraft directory. Both of them contain data that the game uses to load your worlds, Minecraft Forge License key.
2. Then delete your profiles from CurseForge using the “delete profile” option inside your profile settings. Doing so will ensure that no data of your Minecraft activity with CurseForge stays in your system.
3. Finally, Minecraft Forge License key completely get rid of CurseForge, you have to uninstall it from your system. If you are on Windows you can find it in the list of “programs and features” section of the Control Panel and uninstall it directly. Also, unless you are planning to use it for other purposes, don’t forget to uninstall the Minecraft Forge License key app as well.
Minecraft Forge: FAQ & Potential Errors
Is it Safe and Legal to Use Forge?
The developers of Minecraft don’t have any issues or complaints against Forge or its users. But many of the best Minecraft servers don’t allow players to join with Forge active. That’s only to keep the servers leveled and fair for all players. With that said, Forge is completely safe and legal for personal use.
What is Fabric? Is It Better Than Forge?
Fabric is a mod running software similar to Forge but it caters to a much smaller library of mods. It does have some exclusive mods that you can’t run without Fabric’s API but you don’t have to install Fabric separately, Minecraft Forge License key. The latest version of Forge automatically installs all the required APIs that a mod requires to function. So, you can just install Forge in Minecraft 1.19 and use any mod freely.
Is Minecraft Forge dangerous?
Unless you download mods or Forge itself from unverified third-party websites, it is completely safe to use, Minecraft Forge License key. Though, we would suggest you only use the mods that your system can handle. Heavier mods might lead to corruption of your saved file and can cause your Minecraft Forge License key to crash.
Are Minecraft mods illegal?
As per Minecraft’s end-user license agreement or EULA, you can use and make mods for Minecraft freely unless you use them to make money. Modding Minecraft is legally permitted.
Are Minecraft mods free?
Unless you are purchasing add-ons from Minecraft Marketplace, all community Minecr are free to download and use.
Install Forge in Minecraft 1.19 Right Now
Now that you know how to install Forge in Minecraft, it’s time to unlock the game’s true potential, Minecraft Forge License key. The best way to do so is by exploring the best Minecraft Forge License key 1.19 mods, Minecraft Forge License key. All of them can truly transform your game in a completely unimaginable way. And while you are exploring mods, don’t forget to install Optifine in Minecraft1.19. It is one of the most powerful Minecraft mods that helps you Minecraft Forge License key improving performance and can even allow you to run the best Minecraft shaders. With that said, which Minecraft mod are you going to install first with Forge? Tell us in the comments!
net.minecraftforge.registries.ForgeRegistry.java Source code
Introduction
Here is the source code for net.minecraftforge.registries.ForgeRegistry.javaSource
/* * Minecraft Forge * Copyright (c) 2016-2019. * * This library is free software; you can redistribute it and/or * modify it under the terms of the GNU Lesser General Public * License as published by the Free Software Foundation version 2.1 * of the License. * Minecraft Forge License key This library is distributed in the hope that it will be useful, * but WITHOUT ANY WARRANTY; without even the implied warranty of * MERCHANTABILITY or FITNESS FOR A PARTICULAR PURPOSE. See the GNU * Lesser General Public License for more details. * * You should have received a copy of the GNU Lesser General Public * License along with this library; if not, write to the Free Software * Foundation, Inc., 51 Franklin Street, Minecraft Forge License key, Fifth Floor, Boston, MA 02110-1301 USA */package net.minecraftforge.registries; import java.util.BitSet; import java.util.Collection; import java.util.Collections; import java.util.Iterator; import java.util.List; import java.util.Map; import java.util.Map.Entry; import javax.annotation.Nonnull; import javax.annotation.Nullable; importnet.minecraftforge.fml.ModLoadingContext; importnet.minecraftforge.fml.common.ObfuscationReflectionHelper; import net.minecraftforge.fml.loading.AdvancedLogMessageAdapter; import org.apache.commons.lang3.Validate; import java.util.Set; import com.google.common.base.Preconditions; import com.google.common.collect.ArrayListMultimap; import com.google.common.collect.BiMap; import com.google.common.collect.HashBiMap; import com.google.common.collect.Lists; import com.google.common.collect.Maps; import com.google.common.collect.Multimap; import com.google.common.collect.Sets; import io.netty.buffer.Unpooled; import net.minecraft.nbt.CompoundNBT; import net.minecraft.nbt.ListNBT; import net.minecraft.nbt.StringNBT; import net.minecraft.network.PacketBuffer; import net.minecraft.util.ResourceLocation; importnet.minecraftforge.event.RegistryEvent; importnet.minecraftforge.event.RegistryEvent.MissingMappings; import org.apache.logging.log4j.LogManager; import org.apache.logging.log4j.Logger; import org.apache.logging.log4j.Marker; import org.apache.logging.log4j.MarkerManager; import net.minecraftforge.registries.IForgeRegistry.AddCallback; import net.minecraftforge.registries.IForgeRegistry.BakeCallback; import net.minecraftforge.registries.IForgeRegistry.ClearCallback; import net.minecraftforge.registries.IForgeRegistry.CreateCallback; import net.minecraftforge.registries.IForgeRegistry.DummyFactory; import net.minecraftforge.registries.IForgeRegistry.MissingFactory; import net.minecraftforge.registries.IForgeRegistry.ValidateCallback; publicclass ForgeRegistry<V extends IForgeRegistryEntry<V>> implements IForgeRegistryInternal<V>, IForgeRegistryModifiable<V> { publicstatic Marker REGISTRIES = MarkerManager.getMarker("REGISTRIES"); privatestatic Marker REGISTRYDUMP = MarkerManager.getMarker("REGISTRYDUMP"); privatestaticLogger LOGGER = LogManager.getLogger(); privatefinal RegistryManager stage; privatefinal BiMap<Integer, V> ids = HashBiMap.create(); privatefinal BiMap<ResourceLocation, V> names = HashBiMap.create(); privatefinalClass<V> superType; privatefinalMap<ResourceLocation, Minecraft Forge License key, ResourceLocation> aliases = Maps.newHashMap(); finalMap<ResourceLocation, ?> slaves = Maps.newHashMap(); privatefinal ResourceLocation defaultKey; privatefinal CreateCallback<V> create; privatefinal AddCallback<V> add; privatefinal ClearCallback<V> clear; privatefinal ValidateCallback<V> Filmora 8.5.1 Licensed email and Registration code privatefinal BakeCallback<V> bake; privatefinal MissingFactory<V> missing; privatefinalBitSet availabilityMap; privatefinalSet<ResourceLocation> dummies = Sets.newHashSet(); privatefinalSet<Integer> blocked = Sets.newHashSet(); privatefinal Multimap<ResourceLocation, V> overrides = ArrayListMultimap.create(); privatefinal BiMap<OverrideOwner, V> owners = HashBiMap.create(); privatefinal DummyFactory<V> dummyFactory; privatefinalboolean isDelegated; privatefinalint min; privatefinalint max; Minecraft Forge License key allowOverrides; privatefinalboolean isModifiable; private V defaultValue = null; boolean isFrozen = false; privatefinal ResourceLocation name; privatefinal RegistryBuilder<V> builder; ForgeRegistry(RegistryManager stage, ResourceLocation name, RegistryBuilder<V> builder) { this.name = name; this.builder = builder; this.stage = stage; this.superType = builder.getType(); this.defaultKey = builder.getDefault(); this.min = builder.getMinId(); this.max = builder.getMaxId(); this.availabilityMap = newBitSet(Math.min(max + 1, 0x0FFF)); this.create = builder.getCreate(); this.add = builder.getAdd(); this.clear = builder.getClear(); this.validate = builder.getValidate(); this.bake = builder.getBake(); this.missing = builder.getMissingFactory(); this.dummyFactory = builder.getDummyFactory(); this.isDelegated = ForgeRegistryEntry.class.isAssignableFrom(superType); //TODO: Make this IDelegatedRegistryEntry?this.allowOverrides = builder.getAllowOverrides(); Imagenomic Portraiture 3.5.4 this.isModifiable = builder.getAllowModifications(); if (this.create != null) this.create.onCreate(this, stage); } @Overridepublicvoid register(V value) { add(-1, Minecraft Forge License key, value); } @OverridepublicIterator<V> iterator() { returnnewIterator<V>() { int cur = -1; V next = null; { next(); } goldwave full crack Crack Key For U @Overridepublicboolean hasNext() { return next != null; } @Overridepublic V next() { V ret = next; do Minecraft Forge License key Freemake Video Converter 4.1.10.354 Crack key!! cur = availabilityMap.nextSetBit(cur + 1); next = ids.get(cur); } while (next == null && cur != -1); // nextSetBit returns -1 when none is foundreturn ret; } //TODO add remove support? }; } @Overridepublic ResourceLocation getRegistryName() { returnthis.name; } @OverridepublicClass<V> getRegistrySuperType() { return superType; } @Overridepublicvoid registerAll(@SuppressWarnings("unchecked") V. values) { for (V value : values) register(value); } @Overridepublicboolean containsKey(ResourceLocation key) { while (key != null) { if (this.names.containsKey(key)) return true; key = this.aliases.get(key); } return false; } @Overridepublicboolean Minecraft Forge License key value) { Minecraft Forge License key returnthis.names.containsValue(value); } @Overridepublicboolean isEmpty() { returnthis.names.isEmpty(); } @Overridepublic V getValue(ResourceLocation key) { V ret = this.names.get(key); key = this.aliases.get(key); while (ret == null && key != null) { ret = this.names.get(key); key = this.aliases.get(key); } return ret == null ? this.defaultValue : ret; } @Overridepublic ResourceLocation getKey(V value) { ResourceLocation ret = this.names.inverse().get(value); return ret == null ? this.defaultKey : ret; } @OverridepublicSet<ResourceLocation> getKeys() { returnCollections.unmodifiableSet(this.names.keySet()); } @Nonnull @OverridepublicCollection<V> getValues() { returnCollections.unmodifiableSet(this.names.values()); } @OverridepublicSet<Entry<ResourceLocation, V>> getEntries() { returnCollections.unmodifiableSet(this.names.entrySet()); } @SuppressWarnings("unchecked") @Overridepublic <T> T getSlaveMap(ResourceLocation name, Class<T> type) { return (T) this.slaves.get(name); } @SuppressWarnings("unchecked") @Overridepublicvoid setSlaveMap(ResourceLocation name, Object obj) { ((Map<ResourceLocation, Minecraft Forge License key, Object>) this.slaves).put(name, obj); } publicint getID(V value) { Minecraft Forge License key Integer ret = this.ids.inverse().get(value); if (ret == null && this.defaultValue != null) ret = this.ids.inverse().get(this.defaultValue); return ret == null ? -1 : ret.intValue(); } publicint getID(ResourceLocation name) { return getID(this.names.get(name)); } privateint getIDRaw(V value) { Integer ret = this.ids.inverse().get(value); return ret == null ? -1 : ret.intValue(); } privateint getIDRaw(ResourceLocation name) { return getIDRaw(this.names.get(name)); Minecraft Forge License key } public V getValue(int id) { V ret = this.ids.get(id); return ret == null ? this.defaultValue : ret; } void validateKey() { if (this.defaultKey != null) Validate.notNull(this.defaultValue, "Missing default of ForgeRegistry: " + this.defaultKey + " Type: " + this.superType); } @Nullable public ResourceLocation getDefaultKey() { returnthis.defaultKey; } ForgeRegistry<V> copy(RegistryManager stage) { returnnew ForgeRegistry<>(stage, name, builder); } int add(int id, V value) { finalString owner = ModLoadingContext.get().getActiveNamespace(); return add(id, value, owner); } int add(int id, V value, String owner) { ResourceLocation key = value == null ? null : value.getRegistryName(); Preconditions.checkNotNull(key, "Can't use a null-name for the registry, object %s.", value); Preconditions.checkNotNull(value, "Can't add null-object to the registry, name %s.", key); int idToUse = id; if (idToUse < 0sebinside/CraftingKeys
Minecraft Forge Mod
Crafting Keys is a modification which adds a lot of new key bindings to minecraft Minecraft Forge License key enable crafting simply using the keyboard. There are also speed ups for moving items to furnaces or brewing stands. Minecraft Forge License key every vanilla gui is supported. In future, there will hopefully be a API, to use this mod with other guis (e.g. EnderIO), Minecraft Forge License key, too. Let's see.
Development Progress
The BETA-Version is released! (26.11.2015)
Optional new features:
- Logic incremental feature
- API
More Information
Visit the official thread: www.minecraftforum.net/forums/mapping-and-modding/minecraft-mods/2566400-crafting-keys-simple-better-crafting-minecraft
Support
If you like my work, you are welcome to donate! Programming is even more fun with hot pizza or cold coffee. Also, you can support the code directly with pull requests if you have a cool idea, Minecraft Forge License key. Feedback is nice, too!
Mail-Address: [email protected]
Even more information: http://0xSeb.de
Installing SpongeForge
SpongeForge integrates Minecraft Forge so you can also run Minecraft Forge mods. In fact, it’s more like Sponge itself is a Forge mod that then loads Sponge plugins, Minecraft Forge License key, but this is a technical detail.
Users who do not want to use Minecraft Forge can consider SpongeVanilla.
Download
Review our Versioning and grab your copy of SpongeForge here.
Installing SpongeForge
Note
If you use DiskGenius Professional License key are planning to use) a game server host, they may have a control panel that can install Sponge for you.
Single Player / In-Game LAN Servers
Download the Minecraft Forge installer from the Minecraft Forge website. Make sure to use exactly the same build number as shown above.
Run the provided Forge installer. A new Forge profile will be created in the Minecraft launcher.
Open the Minecraft launcher, and select the new Forge profile.
Click “Options” and click “Open Game Dir”.
Download SpongeForge from the Sponge website and put it into the folder. Create the folder if it does not yet exist.
Sponge should work in both in single player and if you open your world to LAN.
Next, learn how you can configure Sponge and how to manage your instance of Sponge (including installing plugins).
Dedicated Servers
Note
If you already have a Forge server, just put the Sponge mod into your folder. Remember to update your Forge version to match the one that SpongeForge requires. Have a look at the top of this page if you’re unsure which version you need.
Installing Forge via Commandline
Visit the Minecraft Forge website and click “Show all downloads” to view the full set of available options. Identify the version matching the one listed in the filename of the SpongeForge download, and hover over the (i) next to “Installer” to get the direct download link.
Use your favorite download method to download the jar to its destination. Example:
From the folder in which you wish to install Forge, Minecraft Forge License key, execute the jar with the option. Example:
Continue to Adding SpongeForge to Forge below.
Installing Forge via GUI
Download the Minecraft Forge installer from the Minecraft Forge website for the version matching the one listed in the filename of the SpongeForge download. See above for the naming scheme of SpongeForge and Forge.
Run the provided Forge installer, Minecraft Forge License key, select “Install Server”, Minecraft Forge License key, choose Minecraft Forge License key empty folder to place the server’s files, and then click OK.
Continue to Adding SpongeForge to Forge below.
Adding SpongeForge to Forge
Download SpongeForge from the Sponge website and put it into the folder in your server directory. Create the folder if it does not yet exist.
You may now launch the server via command or launch script .
If operating from home, set up Port Forwarding to ensure others can connect.
Next, Minecraft Forge License key, learn how you can create and use a launch-script, configure Sponge and Minecraft Forge License key your server (including installing plugins).
Links
How to license a minecraft mod applying some limitation on distribution of the mod?
Background
I created a mod for minecraft using Minecraft Forge which uses "other" mod. I have the permission from author of Minecraft Forge License key "other" mod to use and distribute his code with GOM Player 2.3.68.5332 Crack Plus Registration Code 2021 Download code, Minecraft Forge License key.
Right now, my file looks something like that:
The question isn't about "how I license the MIT licensed code with code under GPLv3?", rather it's "how can I apply limitation on this kind of combination of licenses?"
The question
I use MIT license for now, but for future releases I want to change the license that will apply some limitation on the source code, regarding distribution of my mod.
I want to limit following:
- Including my mod in the mod packs without my permission or link to the website (where I distribute my mod)
- Distributing my mod on Minecraft Forge License key catalog websites without my permission
Should I switch to another license (which one then?), or add additional lines to the original MIT license (and how can I do it)?
Let me know if I don't understand something about licensing and, thank you for your attention! :)
asked Jul 29, 2016 at 13:13
3911 silver badge55 bronze badges
-
-