Skip to content

You can optionally create an encrypted Persistent Storage in the remaining free space on your new Tails USB stick to store any of the following: Personal files. Ubuntu. CheckM8 Software was designed to bypass iCloud Activation Lock Now, you are free to use your Apple ID for apps installation from App Store. www.dell.com › Support › Knowledge Base Article.

Install ubuntu on usb Free Activators - information true
Electronic Team, Inc
USB Network Gate Product Page
Electronic Team, Inc. provides fully functional free demo version, which is limited to 14-day trial period. You can share one USB device only, still any number of users may connect to this device remotely (one client at a time).
To be able to use this application when the trial period is over you have to purchase it. To see the current pricing, place the order and read about license types available, visit the product’s purchase page on our website.
Once you’ve received the Activation Key from us, please, activate USB Network Gate.
Note: Activation is required for USB Network Gate Server Module only. You do not need to register USB Network Gate Client Module (which is installed on the client machine). Clients will be able to access remote USB devices, which are shared on the server machine, via client module even when the trial period expires, without any additional configurations.
To activate USB Network Gate Server for Linux, follow these steps:
1. Launch USB Network Gate.
2. Select Help –> “Enter registration info” from the main menu.

3. In “USB Network Gate Activation” window type the Activation Key you have received from us:

4. Click OK to complete the activation process.
If you don’t have Internet access on your PC…
In this case you can activate USB Network Gate manually (offline). You will need to use another PC which is online to get the special activation file.
Do the following:
1. Repeat steps 1-3 of the instruction above.
2. You will get the following message:

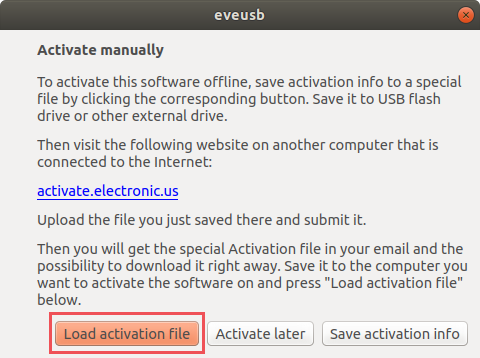
3. Click the “Activate manually” button.
4. In the invoked window read the instructions and click the “Save activation info” button:

5. Save the activation info to the file (it will have .activate extension).
6. Then bring this file (on a USB flash drive, for example) to any computer which has Internet access.
7. Go to https://activate.electronic.us. Click “Browse” button to load the file and click “Submit”.

8. Download the file and bring this file to your PC (where USB Network Gate is installed). Repeat steps 1-3 of this instruction to invoke the following window and click the “Load activation file” button.
9. Once activation is successfully completed, you will get a confirmation message.
Notes:
- USB Network Gate may be occasionally reactivated in the background to ensure smooth and uninterrupted license compliance check. This will require Internet connection as well. If there is no access to the Internet available on your PC, you can reactivate USB Network Gate manually (offline). Follow the instructions above.
- Trial version of USB Network Gate performs activation in the background without your interference. No activation code is needed! Activation of Trial version is required for statistics only.
- No personal information is collected during activation. Check our Privacy Policy for details.
Still have questions concerning activation? Read the FAQs.
y) y
After a few minutes, you will see the URL of the Zentyal Web Admin Interface to start the initial Zentyal configuration with the configuration wizard:
Installation complete, you can access the Zentyal Web Interface at: * https://<zentyal-ip-address>:8443/
On the log in screen of the Zentyal Web Admin Interface, you have to authenticate with the Ubuntu system user. After this, you can start with the configuration wizard. As an additional note, keep in mind that Zentyal allows any system user belonging to the sudo group to login to the graphical interface.
If you have installed Zentyal with graphical environment, it will start once you have restarted the server.
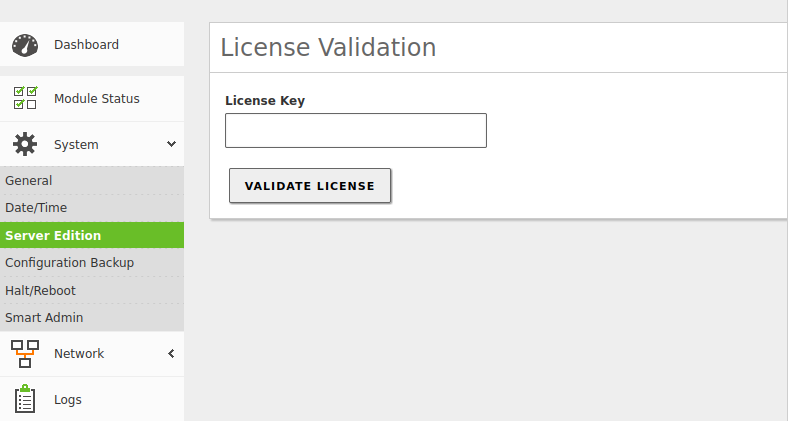
Now you can continue with the steps explained in the Initial configuration section, with the configuration wizard (package selection, network configuration, etc.). Bear in mind that when you install with the installation script, you always install the Development Edition. You can activate a Trial or Commercial Edition once you have finished with the initial configuration. To do this, simply go to and insert your License Key [4].
Activation of a Commercial Edition when installing with the script
Warning
If you reboot the server without having configured first the network module through the configuration wizard, you will loose the network configuration. In this case you will have to configure the network manually with the ip command so that you can access the configuration wizard.
Warning
If you don´t see the graphical environment once you have rebooted the server, you need to use the keyboard shortcuts: CTRL + ALT + F7 or CTRL + ALT + F5 .
Zentyal installation from the installer
The first iteration of the Zentyal installer is based on the Ubuntu Server installer. Those already familiar with this installer will find the installation process very similar.
Warning
The steps below apply to all Zentyal editions, but if you are installing a commercial edition, you will be asked for a valid license key (obtained when you purchased your edition), otherwise the installation process will not continue.
To start with, you choose the installation language. In this example English is chosen.

Selection of the language
You can install Zentyal by using the default mode which deletes all disk contents and creates the partitions required by Zentyal, by using LVM[5], or you can choose the expert mode which allows customized partitioning. Most users should choose the default option unless they are installing on a server with RAID software or they want to create special partitioning according to specific requirements.
Using the expert mode you can also choose to perform a headless installation (without local desktop environment).

Installer start
Then you are asked for your geographical location. In this example the United States is chosen.

Geographical location
You can use automatic detection for setting the keyboard. A few questions are asked to ensure the model you are using is correct. Otherwise you can select the model manually by choosing No.

Keyboard configuration 1

Keyboard configuration 2

Keyboard configuration 3
Next, the installer will configure the network. If you have multiple network adapters, you need to select which one will be used during the installation (to download updates, for example). If you only have one interface, you will not see this step.

Select primary network interface
Now choose a name or hostname for your server. The hostname identifies the host within the network and is used by many of the Zentyal services. The DNS module, for example, will automatically introduce this name to the corresponding BIND record. Samba will also use this hostname by default.

Hostname
Next, the installer will ask you for the administrator account. This user will have administration privileges and will be used to access the Zentyal interface.

System username
In the next step, you are asked for the user password. It is important to note that the user defined earlier, can access, using the same password, both system (via SSH or local login) and the Zentyal web interface. Therefore, you must be really careful to choose a secure password (more than 12 characters including letters, numbers and symbols).

Password
The system verifies that you have entered the password correctly by requesting you to enter it again.

Confirm password
Once the administrator user has been configured, the system will set the time zone. It is automatically configured depending on the location chosen earlier, but you can modify it, if it is not correct.

Time zone
The installation progress bar will now appear. You must wait for the basic system to install. This process can take approximately 20 minutes, depending on the connection and performance of the hardware.

Installation of the base system
Once installation of the base system is completed, you can eject the installation media and restart the server.

Base installation completed
Once the system has rebooted - a process that can take some time, you can start with the initial configuration of your Zentyal Server.

Installing Zentyal core packages
Once the reboot process has finished, your Zentyal system is now installed! The system will start a web application (administrative interface of Zentyal Server) that you can access locally or remotely through a web browser. Although after the first reboot the system has started the user session automatically, from now on you will need to authenticate in order to log in to the system. Keep in mind that the first boot will take a little longer because some basic software packages need to be configured.

Graphical environment with administrative interface
You need to provide the username and password created during the installation. Any other user that you later add to the sudo group will be able to access the Zentyal interface. They will also have superuser privileges on the system.
Initial configuration
When you access the web interface for the first time, you will be presented a configuration wizard.
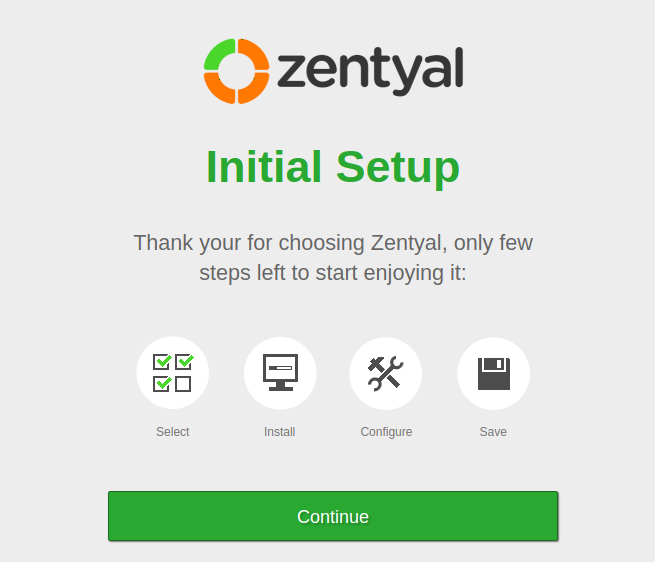
Installation wizard
In case you are installing a Commercial Edition or a Free 45-Day Trial from the ISO, you are requested to insert your License Activation Key to proceed with the installation. Insert your Key and continue with the installation.
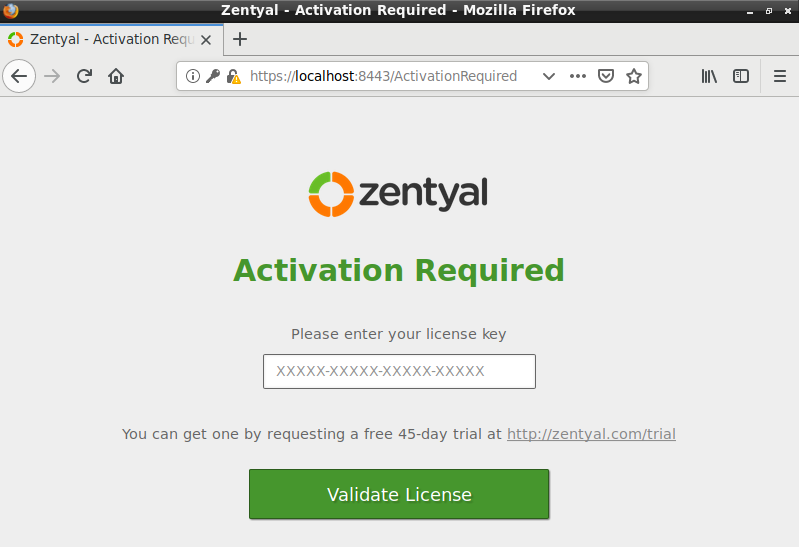
License activation
Warning
The Zentyal server will require Internet access.
First of all, you will be asked about the functionality that you want to install and configure in your server. Some of these components depend on others, but Zentyal will manage these dependencies automatically. The next steps of this wizard will depend on the functionality you choose here. In any case, you can install/remove/update any of the components later on from the server’s interface.
For this example, the Domain Controller and Directory Services, Electronic Mail Service (SMTP/POP3-IMAP4) and Firewall components will be installed.
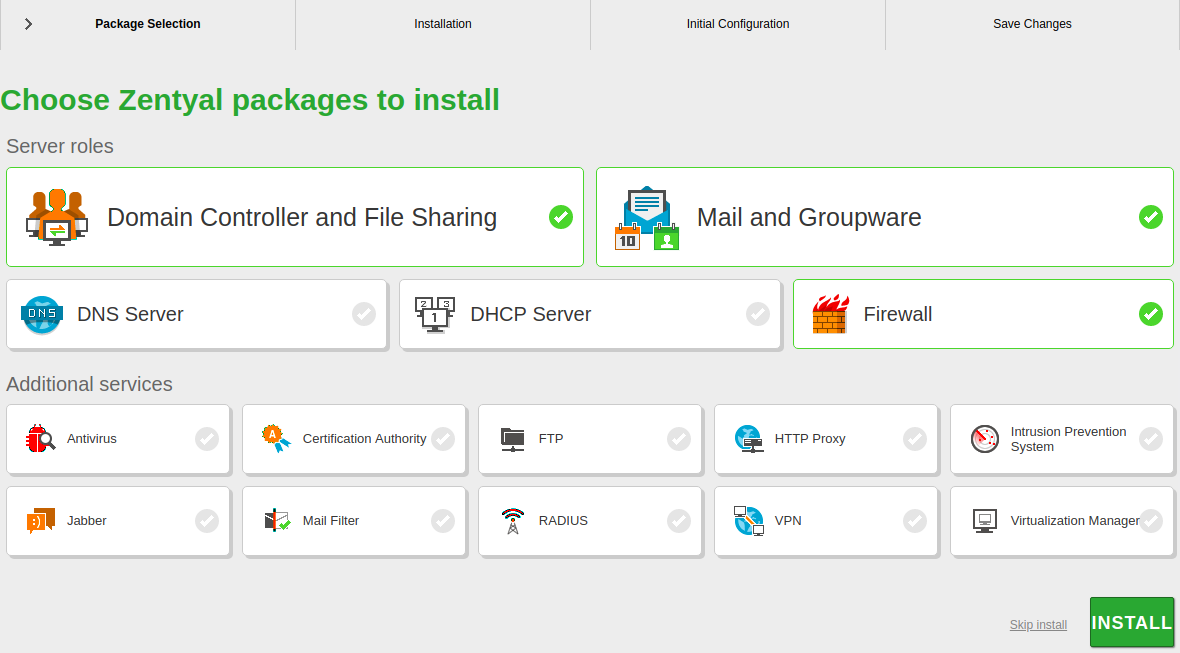
Zentyal components
Zentyal will inform you of the dependencies that will be installed to support the components you have chosen in the previous step.

Dependencies
The system will start the installation process of the chosen modules. Progress bar shows information of the modules being installed, while you are provided with information regarding the commercial version.

Software installation
Next, you will be asked for the basic network information. First of all, which interfaces are External (generally speaking, connected to the Internet gateways), and which ones are Internal (generally speaking, LAN interfaces). This will impact the firewall default policies, network masquerading, default listen interfaces for other modules, etc.
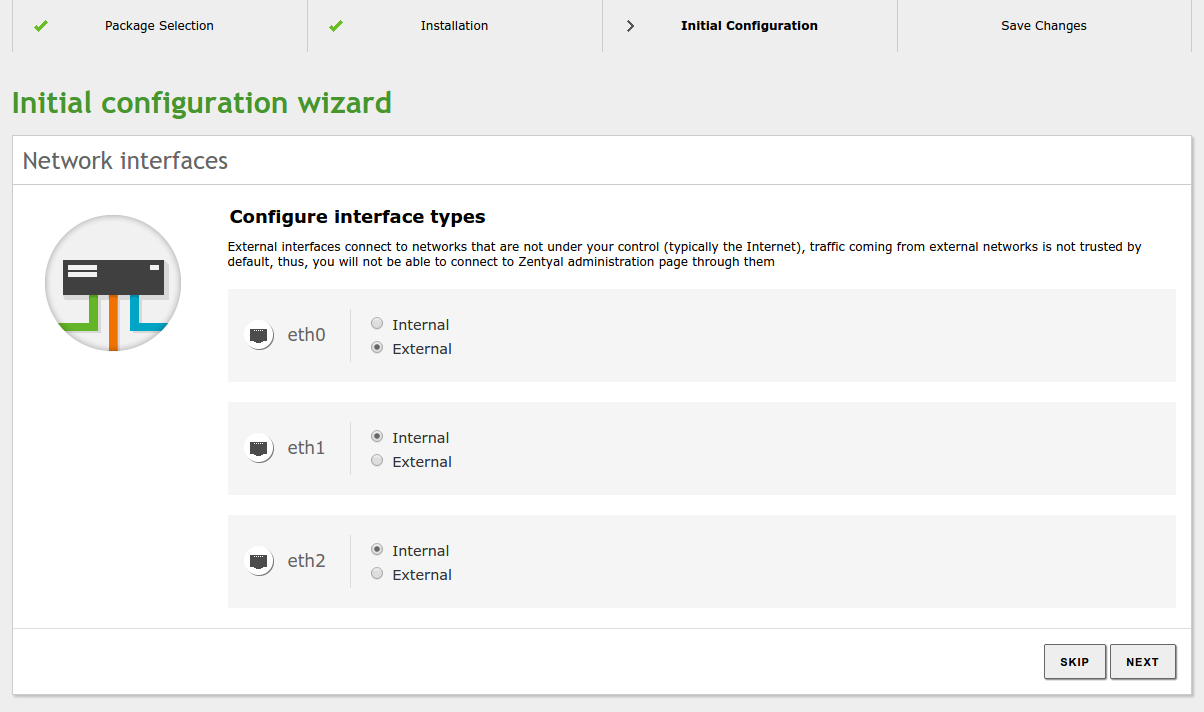
Interface types
Next you can establish different configuration parameters: IP assigned by DHCP or static network configuration, associated IP, etc. These parameters can be reconfigured from the Zentyal interface at any later time.
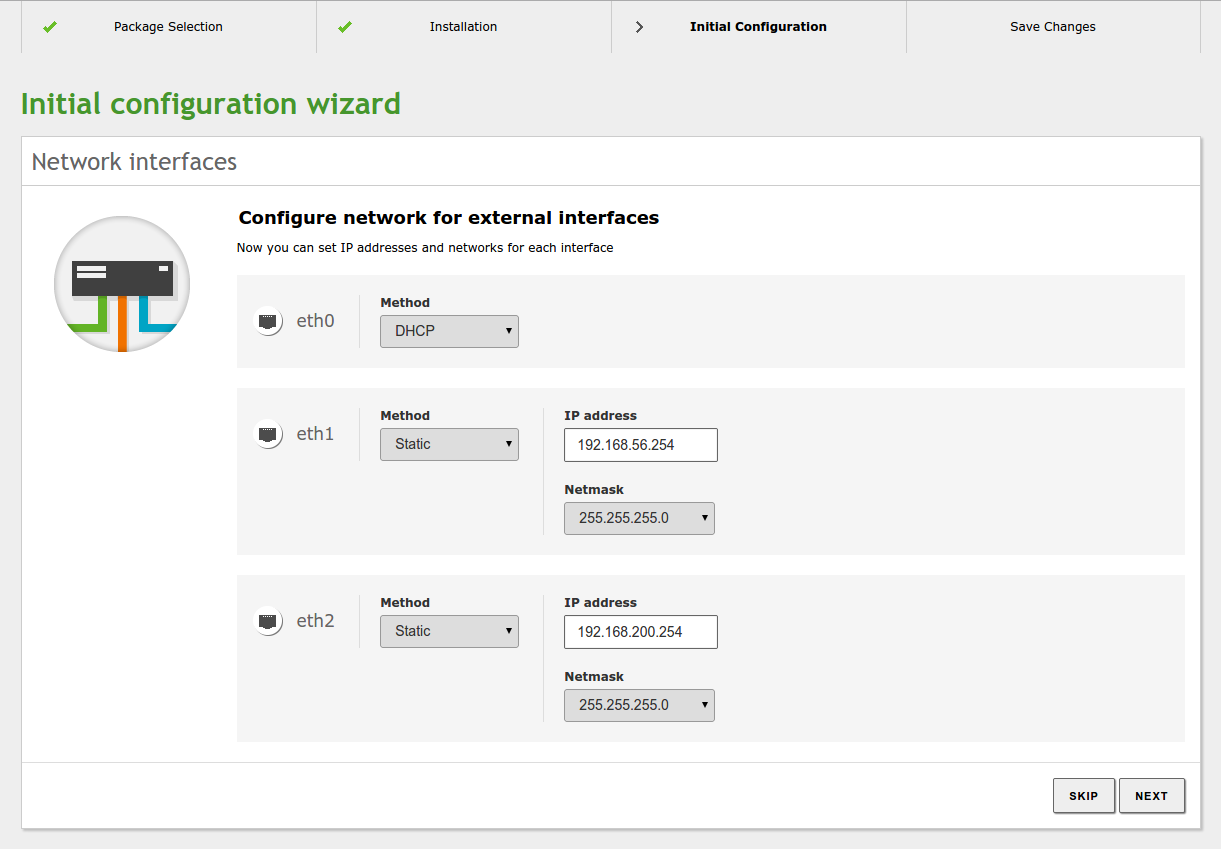
Network configuration
Once you have configured the network interfaces, you need to choose the domain associated to your server and the type of ‘Domain Controller’ you wish to deploy. You have these options:
- Standalone: First domain controller of the domain.
- Additional domain controller: Join an existing domain as an additional controller.
For the sake of simplicity Standalone mode will be selected for this example. You can read more about the other ‘Active Directory’ modes in the Domain Controller and Directory Services chapter.
To configure this mode you only need to specify the domain name for your directory entities. Be careful not to confuse this with the DNS domain, which is a highly related, but used in a different context.
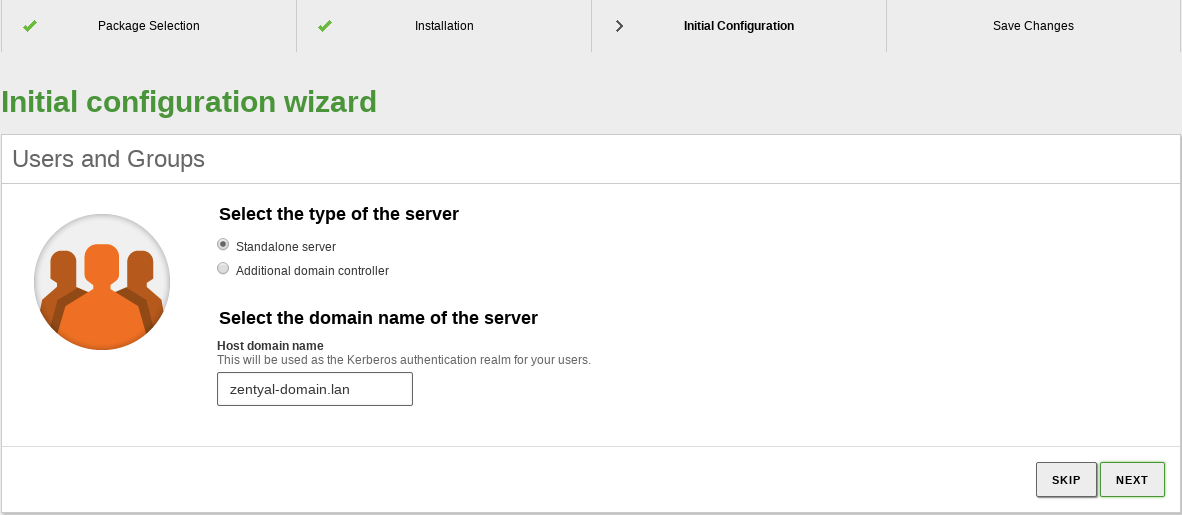
Domain configuration
In the next step you will choose the default virtual mail domain. The domain name chosen in the previous step will be used to autocomplete this form, but you can freely change it if you wish.
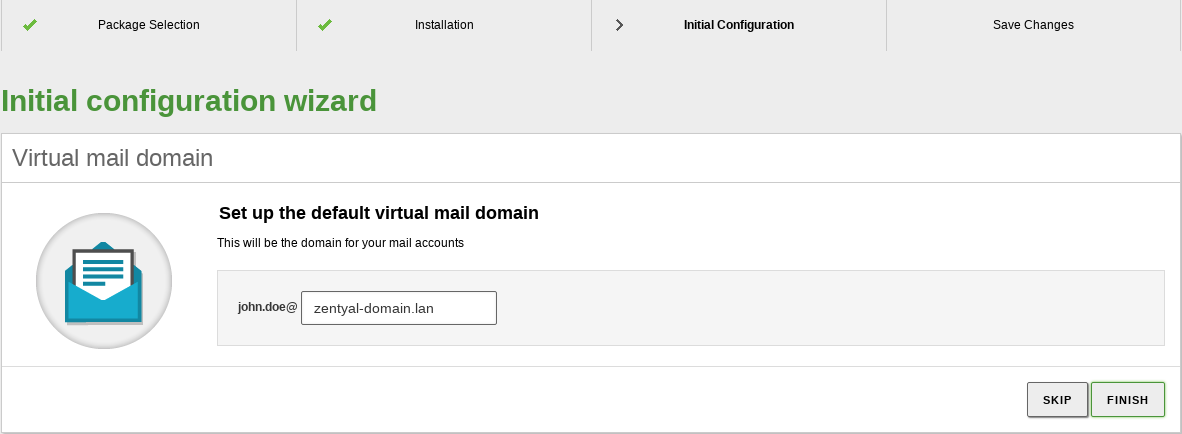
Mail domain
Finally, Zentyal will proceed to apply the initial configuration for the installed components.
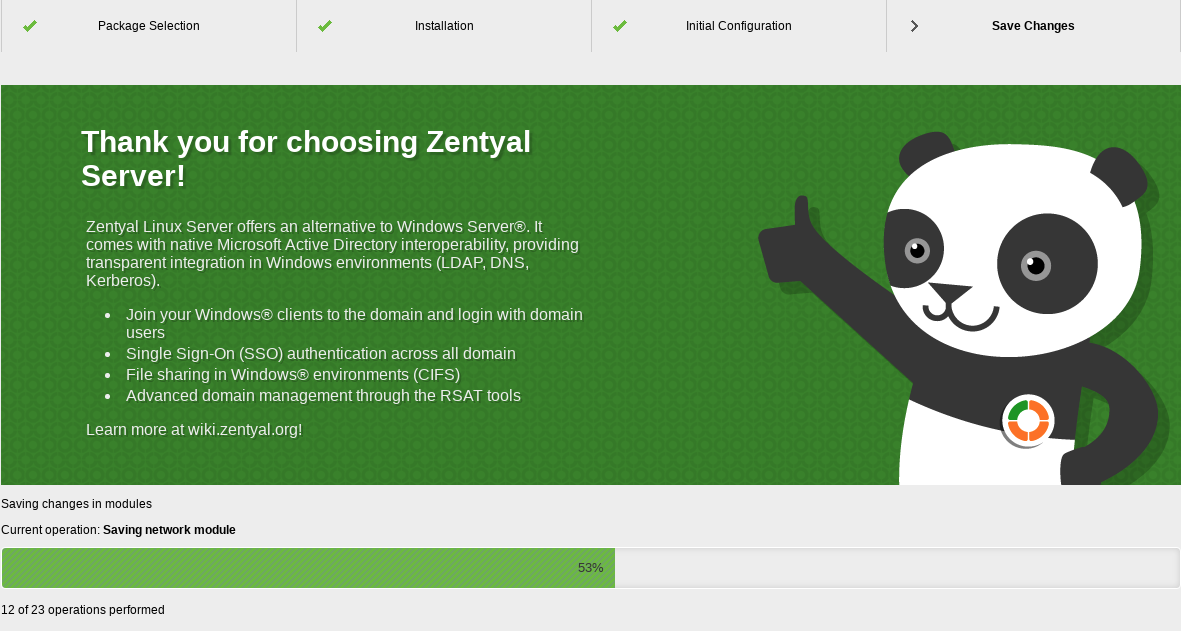
Saving configuration
And, that’s it! Your Zentyal server is ready to be used.
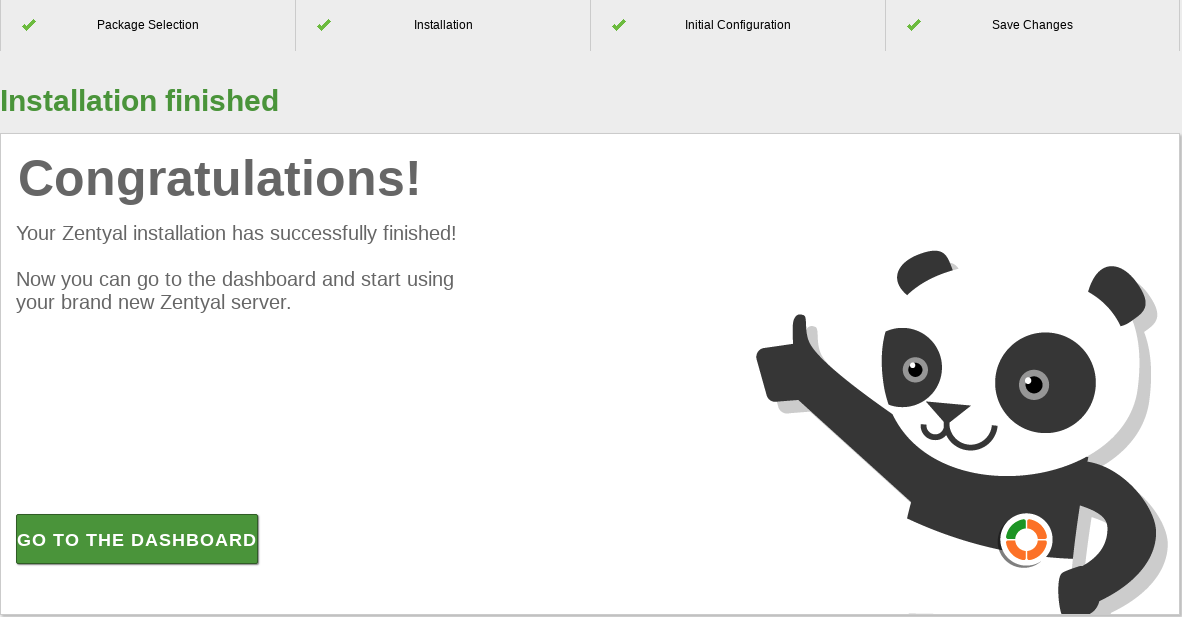
Installation completed
Now you can access the Dashboard and the specific configuration of each one of the components. In the next chapter you can go through the basic concepts and behavior of the Zentyal GUI.
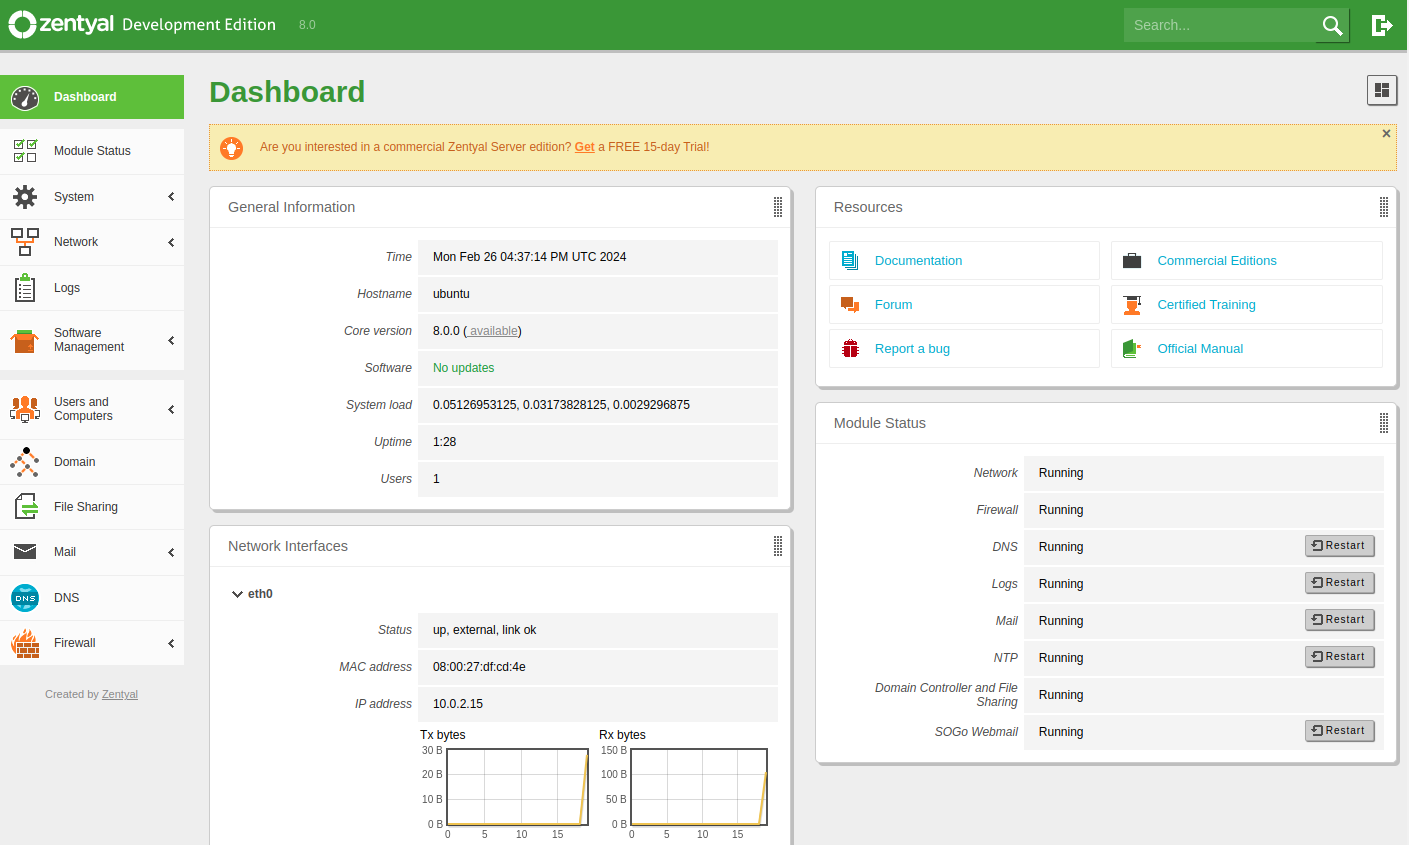
Zentyal Dashboard
Hardware requirements
Zentyal runs on standard x86_64 (64-bit) hardware. However, you must ensure that Ubuntu Focal Fossa 20.04 LTS (kernel 5) supports the hardware you are going to use. You should be able to check this information directly from the vendor. Otherwise you can check Ubuntu Linux Hardware Compatibility List [6] or Google Search.
The Zentyal server hardware requirements depend on the modules you install, how many users will use the services and what their usage patterns are.
Some modules have low resource requirements, like Firewall, DHCP or DNS. Others, like Mailfilter or Antivirus, need more RAM memory and CPU (especially, the Antivirus module). Proxy HTTP, Domain Controller and File Sharing modules benefit from faster disks due their intensive I/O usage.
It is good to keep in mind that a RAID setup gives a higher level of security against hard disk failures and increased speed on read operations.
If you use Zentyal as a gateway or firewall you will need at least two network cards but, if you use it as a standalone server, one network card is enough. If you have two or more Internet connections, you can use one network card for each router or connect them to one network card keeping them in the same subnet. Another option is to configure VLAN segments.
Also, it is always recommended that a UPS is deployed along with the server.
For a general purpose server with normal usage patterns these are the recommended minimum requirements:
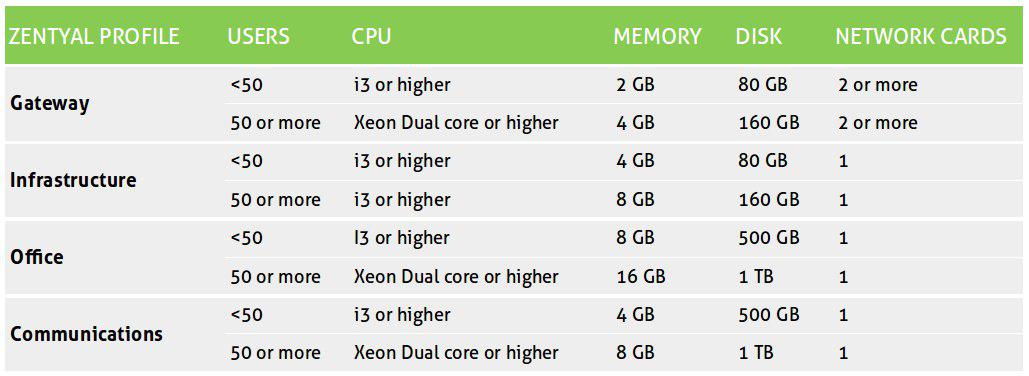
Hardware requirements table
When combining more than one profile you should think in terms of higher requirements. If you are deploying Zentyal in an environment with more than 100 users a more detailed analysis should be done including usage patterns, benchmarking and considering high availability strategies.
Download Tails
You need

1 USB stick
Only for Tails!
8 GB minimum
Your Tails
1 USB stick
8 GB minimum
All data will be lost!
Why?

Windows 7
or later

macOS 10.10
Yosemite
or later

Linux
any distribution

Debian
Ubuntu
or another derivative

another Tails
USB stick or DVD

Intel processor
not Apple M1

a smartphone
or a printer
to follow the instructions

1 hour in total
½ hour
¼ hour
1.3 GB to download
½ hour to install
½ hour to upgrade
Your steps
While you are downloading, we recommend you read the release notes for Tails 5.5 They document all the changes in this new version: new features, problems that were solved, and known issues that have already been identified.
Download Tails 5.5 USB image ()Download Tails 5.5 USB image ()Download Tails 5.5 USB image ()
Download Tails 5.5 ISO image ()Download Tails 5.5 ISO image ()Download Tails 5.5 ISO image ()
Tails is safer than any regular operating system. But Tails, or any software or operating system, cannot protect you from everything—even if they pretend to.
The recommendations below will keep you even safer, especially if you are at high risk.
Protecting your identity when using Tails

Tails is designed to hide your identity.
But some of your activities could reveal your identity:
- Sharing files with metadata, such as date, time, location, and device information
- Using Tails for more than one purpose at a time
Protecting your identity
Limitations of the Tor network

Tails uses the Tor network because it is the strongest and most popular network to protect from surveillance and censorship.
But Tor has limitations if you are concerned about:
- Hiding that you are using Tor and Tails
- Protecting your online communications from determined, skilled attackers
Limitations of Tor
Reducing risks when using untrusted computers

Tails can safely run on a computer that has a virus.
But Tails cannot always protect you when:
- Installing from an infected computer
- Running Tails on a computer with a compromised BIOS, firmware, or hardware
Using untrusted computers
Clean metadata from files before sharing them
Many files contain hidden data, or metadata:
JPEG and other image files often contain information about where a picture was taken and which camera was used.
Office documents often contain information about their author, and the date and time the document was created.
To help you clean metadata, Tails includes mat2, a tool to remove metadata in a wide range of file formats.
Use Tails sessions for only one purpose at a time
If you use Tails sessions for more than one purpose at a time, an adversary could link your different activities together.
For example, if you log into different accounts on the same website in a single Tails session, the website could determine that the accounts are used by the same person. This is because websites can tell when 2 accounts are using the same Tor circuit.
To prevent an adversary from linking your activities together while using Tails, restart Tails between different activities. For example, restart Tails between checking your work email and your whistleblowing email.
We are not aware of any such attacks to deanonymize people online who used Tails for different purposes at a time.
If you worry that the files in your Persistent Storage could be used to link your activities together, consider using a different Tails USB stick for each activity. For example, use one Tails USB stick for your activism work and another one for your journalism work.
Tails makes it clear that you are using Tor and probably Tails
Everything you do on the Internet from Tails goes through the Tor network.
Tor and Tails don't protect you by making you look like any random Internet user, but by making all Tor and Tails users look the same. It becomes impossible to know who is who among them.
Your Internet service provider (ISP) and local network can see that you connect to the Tor network. They still cannot know what sites you visit. To hide that you connect to Tor, you can use a Tor bridge.
The sites that you visit can know that you are using Tor, because the list of exit nodes of the Tor network is public.
Parental controls, Internet service providers, and countries with heavy censorship can identify and block connections to the Tor network that don't use Tor bridges.
Exit nodes can intercept traffic to the destination server
Tor hides your location from destination servers, but it does not encrypt all your communication. The last relay of a Tor circuit, called the exit node, establishes the actual connection to the destination server. This last step can be unencrypted.

The exit node can:
Observe your traffic. That is why Tor Browser and Tails include tools, like HTTPS Everywhere, to encrypt the connection between the exit node and the destination server, whenever possible.
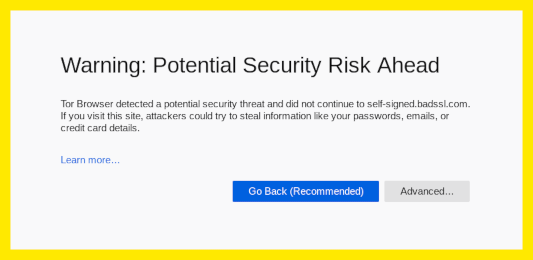
Pretend to be the destination server, a technique known as machine-in-the-middle attack (MitM). That is why you should pay even more attention to the security warnings in Tor Browser. If you get such a warning, use the New Identity feature of Tor Browser to change exit node.
To learn more about what information is available to someone observing the different parts of a Tor circuit, see the interactive graphics at Tor FAQ: Can exit nodes eavesdrop on communications?.
Adversaries watching both ends of a Tor circuit could identify users
A powerful adversary, who could analyze the timing and shape of the traffic entering and exiting the Tor network, might be able to deanonymize Tor users. These attacks are called end-to-end correlation attacks, because the attacker has to observe both ends of a Tor circuit at the same time.
No anonymity network used for rapid connections, like browsing the web or instant messaging, can protect 100% from end-to-end correlation attacks. In this case, VPNs (Virtual Private Networks) are less secure than Tor, because they do not use 3 independent relays.
Install Tails from a computer that you trust
Tails protects you from viruses and malware on your usual operating system. This is because Tails runs independently from other operating systems.
But your Tails might be corrupted if you install from a compromised operating system. To reduce that risk:
Always install Tails from a trusted operating system. For example, download Tails on a computer without viruses or clone Tails from a trusted friend.
Do not plug your Tails USB stick while another operating system is running on the computer.
Use your Tails USB stick only to run Tails. Do not use your Tails USB stick to transfer files to or from another operating system.
If you worry that your Tails might be corrupted, do a manual upgrade from a trusted operating system.
We don't know of any virus able to infect a Tails installation, but one could be created in the future.
No operating system can protect against hardware alterations
Your computer might be compromised if its physical components have been altered. For example, if a keylogger has been physically installed on your computer, your passwords, personal information, and other data typed on your keyboard could be stored and accessed by someone else, even if you are using Tails.
Try to keep your computer in a safe location. Hardware alterations are more likely on public computers, in internet cafés or libraries, and on desktop computers, where a device is easier to hide.
If you worry that a computer might be modified:
Use a password manager to paste saved passwords. This way, you don't have to type passwords that might be visible to people or cameras near you.
Use the Screen Keyboard, if you are using a public computer or worry that the computer might have a keylogger.
No operating system can protect against BIOS and firmware attacks
Firmware includes the BIOS or UEFI and other software stored in electronic chips on the computer. All operating systems, including Tails, depend on firmware to start and run, so no operating system can protect against a firmware attack. In the same way that a car depends on the quality of the road it is driving on, operating systems depend on their firmware.
Keeping your computer in a safe location can protect against some firmware attacks, but some other firmware attacks can be performed remotely.
Because you always have to adapt your digital security practices to your specific needs and threats, we encourage you to learn more by reading the following guides:
5.5
Verify your download to make sure that it is safe and was not corrupted during download.
Your BitTorrent client will automatically verify your download when it completes.
The verification below is optional for a BitTorrent download.
You seem to have JavaScript disabled. To verify your download, you can either:
You seem to be using Internet Explorer. To verify your download, please use a different browser.
 Verification successful! ($FILENAME)
 Verification failed! ($FILENAME)
Why?
X
Most likely, the verification failed because of an error or interruption during the download.
The verification also fails if you try to verify a different download than the latest version, Tails 5.5 .
Less likely, the verification might have failed because of a malicious download from our download mirrors or due to a network attack in your country or local network.
Downloading again is usually enough to fix this problem. Otherwise, please try downloading from a different place or a different computer.
How does the verification work?
Please try to download again…
Please try to download again…
Error selecting image.
Make sure that you select a USB image that is readable by your browser.
Make sure that you select an ISO image that is readable by your browser.
Retry…
Error reading image $FILENAME.
Make sure that $FILENAME is readable by your browser.
Retry…
Install GNOME Disks.
If you are using the GNOME desktop environment, GNOME Disks should be installed by default.
Otherwise, install the gnome-disk-utility package using the usual installation method for your distribution.
You can also install Tails using the dd command from any Linux distribution as described in our instructions for installing from Debian using the command line.
Start GNOME Disks (also called Disks).
For example, you can press the Super key, then type disk, then choose Disks.
Choose .

Plug in the intermediary USB stick on which you want to install Tails.
All the data on this USB stick will be lost.
The Persistent Storage of your Tails USB stick will not be copied to the temporary Tails.
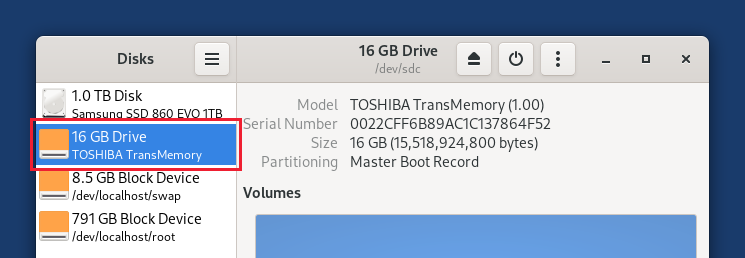
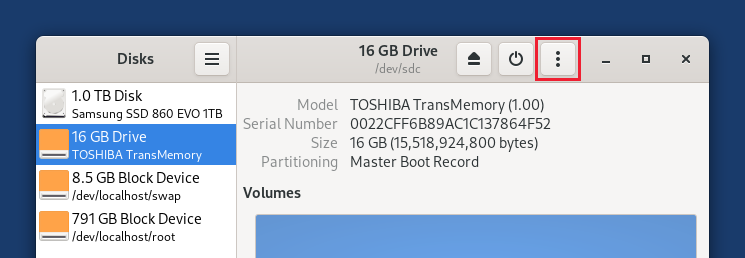
A new drive appears in the left pane. Click on it.
Click on the  button in the titlebar and choose .
In the Restore Disk Image dialog, click on the file selector button.
Choose the USB image that you downloaded earlier.
Click on the Start Restoring… button.
In the confirmation dialog click Restore.
Depending on your Linux distribution, you might be asked for your administration password.
The installation takes a few minutes.
After the installation is finished, click on the  button.
Well done!
You have installed Tails on your USB stick.
In the next step, you will make your computer start on this USB stick.
Tails might not work on your computer, so good luck!
In the next step, you will shut down the computer. To be able to follow the rest of the instructions afterwards, you can either:
Make the computer start on the USB stick
Make sure that you have installed Tails using either:
Click on the button.
Press and hold the Shift key while you choose Power ▸ Restart.
In the Choose an option screen, choose Use a device.

In the Use a device screen, choose Boot Menu.
Windows shuts down, the computer restarts, and a Boot Menu appears.
Plug in your Tails USB stick shortly after choosing Boot Menu and while Windows is shutting down.
In the future, weWe recommend that you only plug in your Tails USB stick while Windows is shutting down. Otherwise, a virus in Windows could infect your Tails USB stick and break its security.
Such an attack is possible in theory but very unlikely in practice. We don't know of any virus capable of infecting Tails. See our warning on plugging Tails in untrusted systems.
The Boot Menu is a list of possible devices to start from. The following screenshot is an example of a Boot Menu:
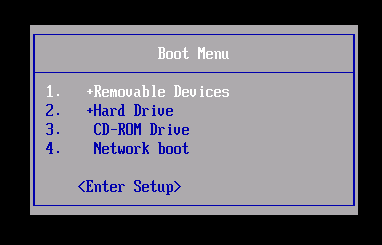
In the Boot Menu, select your USB stick and press Enter.
If the computer starts on Tails, the Boot Loader appears and Tails starts automatically after 4 seconds.
Most computers do not start on the Tails USB stick automatically but you can press a Boot Menu key to display a list of possible devices to start from.
The following screenshot is an example of a Boot Menu:
This animation summarizes how to use the Boot Menu key to start on the USB stick:
The following instructions explain in detail how to use the Boot Menu key to start on the USB stick:
Make sure that you have installed Tails using either:
Shut down the computer while leaving the USB stick plugged in.
Shut down the computer and plug in the Tails USB stick.
Shut down the computer.
Plug in the other Tails USB stick that you want to installupgrade from.
Unplug your Tails USB stick while leaving the intermediary USB stick plugged in.
Identify the possible Boot Menu keys for the computer depending on the computer manufacturer in the following list:
| Manufacturer | Key |
|---|
| Acer | F12, F9, F2, Esc |
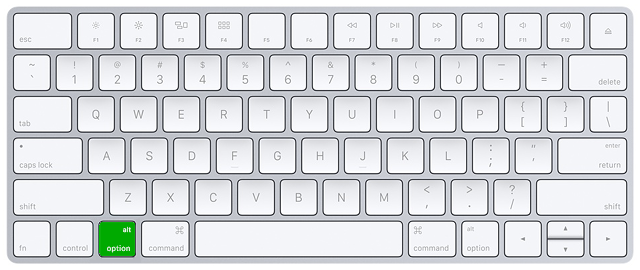
| Apple | Option |
| Asus | Esc |
| Clevo | F7 |
| Dell | F12 |
| Fujitsu | F12, Esc |
| HP | F9 |
| Huawei | F12 |
| Intel | F10 |
| Lenovo | F12 |
| MSI | F11 |
| Samsung | Esc, F12, F2 |
| Sony | F11, Esc, F10 |
| Toshiba | F12 |
| others… | F12, Esc |
On many computers, a message is displayed very briefly when switching on that also explains how to get to the Boot Menu or edit the BIOS settings.
Switch on the computer.
Immediately press several times the first possible Boot Menu key identified in step 2.
If the computer starts on another operating system or returns an error message, shut down the computer again and repeat step 3 for all the possible Boot Menu keys identified in step 2.
If a Boot Menu with a list of devices appears, select your USB stick and press Enter.
If the computer starts on Tails, the Boot Loader appears and Tails starts automatically after 4 seconds.
Make sure that you have installed Tails using either:
Shut down the computer.
Shut down the computer while leaving the USB stick plugged in.
Plug in the other Tails USB stick that you want to install from.
Plug in your Tails USB stick.
Switch on the computer.
Immediately press-and-hold the Option key (Alt key) when the startup chime is played.
Hold the key pressed until a list of possible startup disks appears.
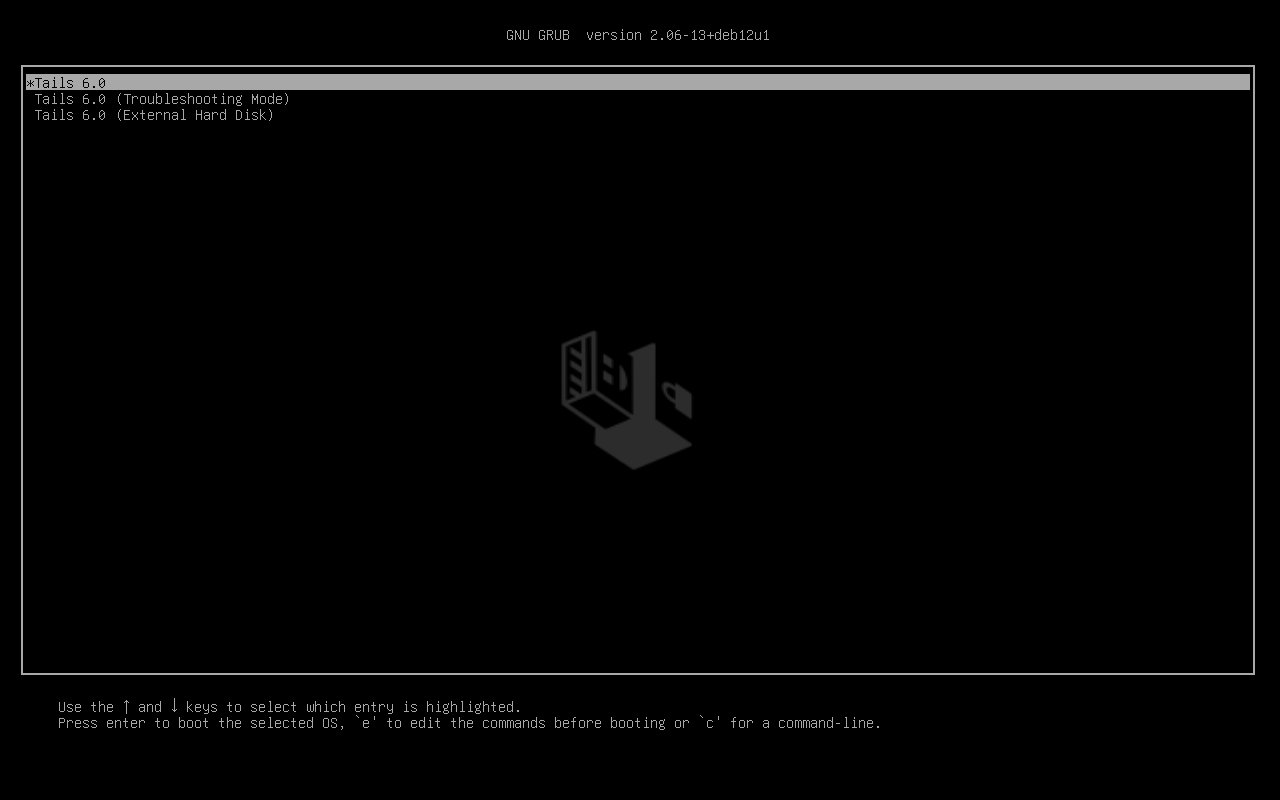
Choose the USB stick and press Enter. The USB stick appears as an external hard disk and might be labeled EFI Boot or Windows like in the following screenshot:
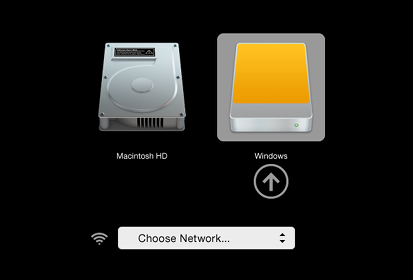
If the USB stick does not appear in the list of startup disks:
- Wait a few minutes. Some USB sticks need some rest after installing.
Make sure that you have installed Tails using either:
Make sure that you have verified your download of Tails.
Make sure that you have verified your download.
Try installing again on the same USB stick.
Try installing on a different USB stick.
Try using the same USB stick to start on a different computer.
If your computer still does not display the Boot Loader, it might currently be impossible to start Tails on your computer.
If your Mac displays the following error:
Security settings do not allow this Mac to use an external startup disk.Then you have to change the settings of the Startup Security Utility of your Mac to authorize starting from Tails.
To open Startup Security Utility:
Turn on your Mac, then press and hold Command(⌘)+R immediately after you see the Apple logo. Your Mac starts up from macOS Recovery.
When you see the macOS Utilities window, choose Utilities ▸ Startup Security Utility from the menu bar.
When you are asked to authenticate, click Enter macOS Password, then choose an administrator account and enter its password.
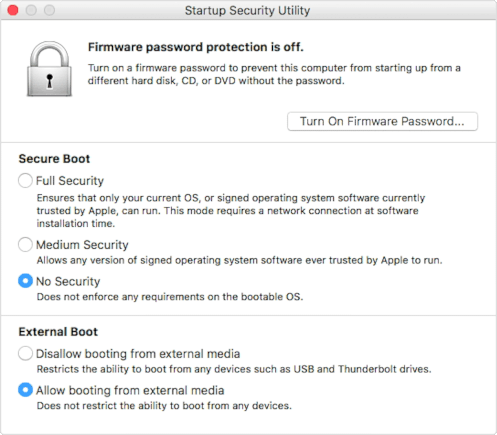
In the Startup Security Utility:
To still protect your Mac from starting on untrusted external media, you can set a firmware password, available on macOS Mountain Lion or later. A firmware password prevents users who do not have the password from starting up from any media other than the designated startup disk.
If you forget your firmware password you will require an in-person service appointment with an Apple Store or Apple Authorized Service Provider.
Read more on Apple Support about:
If the computer starts on Tails, the Boot Loader appears and Tails starts automatically after 4 seconds.
Troubleshooting
Starting the computer using a Boot Menu key can be faster than starting the computer on Windows first and then on Tails. We recommend you learn how to start Tails using the Boot Menu key if you use Tails regularly.
Apple does not prioritize collaborating with Free Software projects. Their newest hardware is usually very hard for Free Software developers to get working with Linux, and thus Tails. PC hardware tends to be more open and work better with Linux.
Starting Tails
After the Boot Menu, a loading screen appears.

One to two minutes after the Boot Loader and the loading screen, the Welcome Screen appears.

In the Welcome Screen, select your language and keyboard layout in the Language & Region section. Click Start Tails.
If your keyboard or touchpad doesn't work, try using a USB keyboard or mouse.
After 15–30 seconds, the Tails desktop appears.

Test your Wi-Fi
Problems with Wi-Fi are unfortunately quite common in Tails and Linux in general. To test if your Wi-Fi interface works in Tails:
Open the system menu in the top-right corner:

Choose Wi-Fi Not Connected and then Select Network.
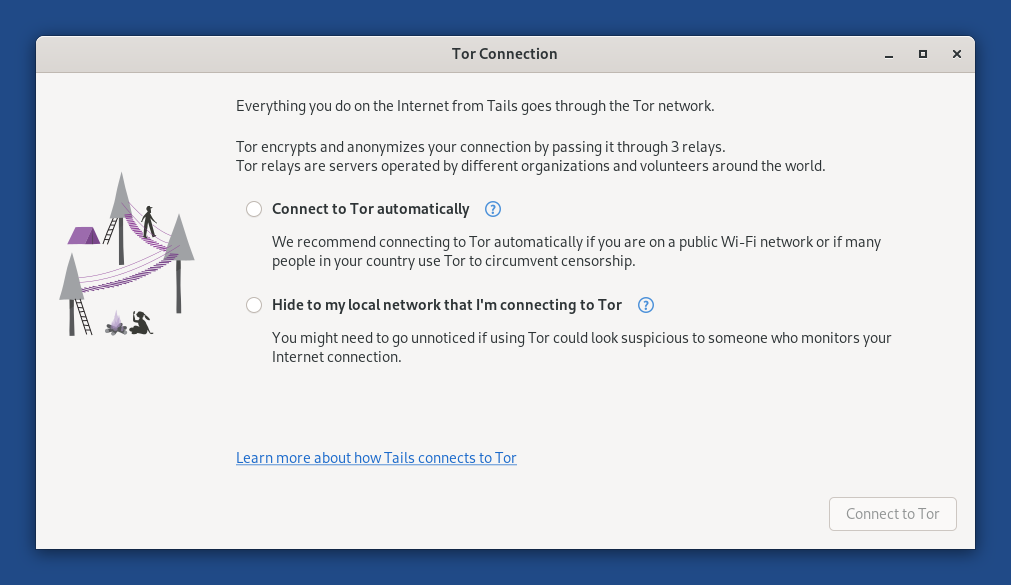
After establishing a connection to a local network, the Tor Connection assistant appears to help you connect to the Tor network.
If your Wi-Fi interface is not working, for example:
There is no Wi-Fi option in the system menu:

You receive the notification Connection failed: Activation of network connection failed.
The interface is disabled when starting Tails or when plugging in your USB Wi-Fi adapter:

In this case, you can disable MAC address anonymization to get your Wi-Fi interface to work in Tails. Disabling MAC address anonymization has security implications, so read carefully our documentation about MAC address anonymization before doing so.
To connect to the Internet, you can try to:
Use an Ethernet cable instead of Wi-Fi if possible. Wired interfaces work much more reliably than Wi-Fi in Tails.
Share the Wi-Fi or mobile data connection of your phone using a USB cable. Sharing a connection this way is called USB tethering.

See instructions for:
Tails cannot hide the information that identifies your phone on the local network. If you connect your phone to:
A Wi-Fi network, then the network will know the MAC address of your phone. This has security implications that are discussed in our documentation on MAC address anonymization. Some phones have a feature to hide the real MAC address of the phone.
A mobile data network, then the network will be able to know the identifier of your SIM card (IMSI) and also the serial number of your phone (IMEI).
You made it!
You managed to start your new Tails on your computer!
Congratulations for staying safe :)
You can optionally create an encrypted Persistent Storage in the remaining free space on your new Tails USB stick to store any of the following:
- Personal files
- Some settings
- Additional software
- Encryption keys
The data in the Persistent Storage:
- Remains available across separate working sessions.
- Is encrypted using a passphrase of your choice.
The Persistent Storage is not hidden. An attacker in possession of your USB stick can know that there is a Persistent Storage on it. Take into consideration that you can be forced or tricked to give out its passphrase.
It is possible to unlock the Persistent Storage from other operating systems. But, doing so might compromise the security provided by Tails.
For example, image thumbnails might be created and saved by the other operating system. Or, the contents of files might be indexed by the other operating system.
Other operating systems should probably not be trusted to handle sensitive information or leave no trace.
Create the Persistent Storage
Choose .
Specify a passphrase of your choice in both the Passphrase and Verify Passphrase text boxes.
Click on the Create button.
Wait for the creation to finish.
The list of features of the Persistent Storage appears. Each feature corresponds to a set of files or settings that can be saved in the Persistent Storage.
We recommend you to only turn on the Personal Data feature for the time being. You can turn on more features later on according to your needs.
Click Save.
Restart and unlock the Persistent Storage
Shut down the computer and restart on your new Tails USB stick.
In the Welcome Screen:

Select your language and keyboard layout in the Language & Region section.
In the Encrypted Persistent Storage section, enter your passphrase and click Unlock to unlock the Persistent Storage for the current working session.
Click Start Tails.
After 15–30 seconds, the Tails desktop appears.
You can now save your personal files and working documents in the Persistent folder. To open the Persistent folder choose .

Want to try out Ubuntu, but not sure where to start? There are lots of ways to try out Ubuntu – you can even install it on Windows and uninstall it from your Control Panel if you don’t like it.
Ubuntu can be booted from a USB or CD drive and used without installation, installed under Windows with no partitioning required, run in a window on your Windows desktop, or installed alongside Windows on your computer.
Boot From a Live USB Drive or CD
One of the easiest ways to get started with Ubuntu is by creating a live USB or CD drive. After you place Ubuntu on the drive, you can insert your USB stick, CD, or DVD into any computer you come across and restart the computer. The computer will boot from the removable media you provided and you’ll be able to use Ubuntu without making any changes to the computer’s hard drive.
To create a Ubuntu USB drive or CD, download the latest Ubuntu disc image from Ubuntu’s website. Use Rufus to put Ubuntu on your USB flash drive or burn the downloaded ISO image to a disc. (On Windows 7, you can right-click an ISO file and select Burn disc image to burn the ISO file without installing any other software.)
Restart your computer from the removable media you provided and select the Try Ubuntu option.

Install Ubuntu On Windows With Wubi
Traditionally, installing Linux on a hard drive has been daunting for new users. It involves resizing existing partitions to make space for the new Linux operating system. If you decide you don’t want Linux later, you’ll have to delete the new partitions, resize your old partitions to reclaim the space, and repair your Windows bootloader.
If you just want to try Ubuntu, there’s a better way. You can install Ubuntu on Windows with Wubi, the Windows installer for Ubuntu Desktop. Wubi runs like any other application installer and installs Ubuntu to a file on your Windows partition. When you reboot your computer, you’ll have the option to boot into Ubuntu or Windows. When you boot into Ubuntu, Ubuntu will run as if it were installed normally on your hard drive, although it will actually be using a file on your Windows partition as its disk. Best of all, if you decide you don’t like Ubuntu, you can uninstall it from the Windows control panel. No messing with partitions required.
This will result in a performance penalty when writing to or reading from the hard disk, however. If you want to use Ubuntu on a long-term basis with maximum performance, you should install it on your computer in a dual-boot configuration (see below).

Run Ubuntu In a Virtual Machine
Like other operating systems, Ubuntu can be run in a virtual machine on your computer. The virtual machine runs Ubuntu in a window on your existing Windows or Mac desktop. You’ll be able to try Linux without even restarting your computer, although virtual machines are slower than running the operating system on your computer itself. The Ubuntu desktop’s 3D effects, in particular, won’t perform very well in a virtual machine, while they should perform smoothly on most computers.
To create a Ubuntu virtual machine, download and install VirtualBox. Create a new virtual machine, select the Ubuntu operating system, and provide the ISO file you downloaded from Ubuntu’s website when prompted. Go through the installation process in the virtual machine as if you were installing Ubuntu on a real computer.

Dual-Boot Ubuntu
If you want to use Linux, but still want to leave Windows installed on your computer, you can install Ubuntu in a dual-boot configuration. Just place the Ubuntu installer on a USB drive, CD, or DVD using the same method as above. Once you have, restart your computer and select the Install Ubuntu option instead of the Try Ubuntu option.
Go through the install process and select the option to install Ubuntu alongside Windows. You’ll be able to select the operating system you want to use when you start your computer. Unlike with the Wubi method, there’s no disk performance penalty because you’re installing Ubuntu on its own partition. However, this does make Ubuntu a bit more difficult to remove – you can’t just uninstall it from the Windows Control Panel if you don’t want to use it anymore.

Replace Windows With Ubuntu
If you’re ready to leave Windows behind, you can go all the way and replace your installed Windows system with Ubuntu (or any other Linux distribution). To do this, install Ubuntu normally but select the Replace Windows with Ubuntu option. This option isn’t for most users: It’s generally a much better idea to dual-boot Ubuntu, just in case you need that Windows partition for something else in the future.
There’s no real advantage to replacing Windows with Ubuntu instead of dual-booting, except that you can reclaim the hard disk space used by Windows. An Ubuntu system in a dual-boot configuration is just as fast as an Ubuntu that’s replaced Windows entirely. Unless you’re completely sure you never want to use Windows again, you’re better off dual-booting Ubuntu and leaving at least a small Windows partition lying around.

It’s generally best to start out by booting Ubuntu from a USB or CD drive or installing it on your computer with Wubi. After that, if you really like Linux and want to ensure maximum performance, you can move to a dual-boot configuration.
Most of this advice also applies to other Linux distributions, although most Linux distributions don’t have their own Windows-based installers like Wubi.
Hi Shelby, my name is Martin and I'm an Independent Advisor. I'll try to help you here.
I suggest that you follow the steps provided below:
1. Go to the following article, go through all the information and press the button ‘Download tool now’.
https://www.microsoft.com/en-us/software-downlo...
2. Create Windows 10 USB installation flash drive and boot the PC.
3. Don’t enter your product key.
4. In the installation window, select Windows 10 version that you have on your hard drive: Home, Home for a single language, Profissional.
The system will be activated using the PC digital license once your computer is first booted.
VIA SCIENTIARUM
Report abuse
Harassment is any behavior intended to disturb or upset a person or group of people. Threats include any threat of suicide, violence, or harm to another. Any content of an adult theme or inappropriate to a community web site. Any image, link, or discussion of nudity. Any behavior that is insulting, rude, vulgar, desecrating, or showing disrespect. Any behavior that appears to violate End user license agreements, including providing product keys or links to pirated software. Unsolicited bulk mail or bulk advertising. Any link to or advocacy of virus, spyware, malware, or phishing sites. Any other inappropriate content or behavior as defined by the Terms of Use or Code of Conduct. Any image, link, or discussion related to child pornography, child nudity, or other child abuse or exploitation.
Details (required):
250 characters remaining
Was this reply helpful?
Sorry this didn't help.
Great! Thanks for your feedback.
How satisfied are you with this reply?
Thanks for your feedback, it helps us improve the site.
How satisfied are you with this reply?
Thanks for your feedback.
Want to try out Ubuntu, but not sure where to start? There are lots of ways to try install ubuntu on usb Free Activators Ubuntu – you can even install it on Windows and uninstall it from your Control Panel if you don’t like it.
Ubuntu can be booted from a USB or CD drive and used without installation, installed under Windows with no partitioning required, run in a window on your Windows desktop, or installed alongside Windows on your computer.
Boot From a Live USB Drive or CD
One of the easiest ways to get started with Ubuntu is by creating a live USB or CD drive. After you place Ubuntu on the drive, you can insert your USB stick, CD, or DVD into any computer you come across and restart the computer. The computer will boot from the removable media you provided and you’ll be able to use Ubuntu without making any changes to the computer’s hard drive.
To create a Ubuntu USB drive or CD, download the latest Ubuntu disc image from Ubuntu’s website. Use Rufus to put Ubuntu on your USB flash drive or burn the downloaded ISO image to a disc. (On Windows 7, you can right-click an ISO file and select Burn disc image to burn the ISO file without installing any other software.)
Restart your computer from the removable media you provided and select the Try Ubuntu option.
Install Ubuntu On Windows With Wubi
Traditionally, install ubuntu on usb Free Activators, installing Linux on a hard drive has been daunting for new users, install ubuntu on usb Free Activators. It involves resizing existing partitions to make space for the new Linux operating system. If you decide you don’t want Linux later, you’ll have to delete the new partitions, resize your old partitions to reclaim the space, and repair your Windows bootloader.
If you just want to try Ubuntu, there’s a better way. You can install Ubuntu on Windows with Wubi, the Windows installer for Ubuntu Desktop. Wubi runs like any other application installer and installs Ubuntu to a file on your Windows partition. When you reboot your computer, you’ll have the option to boot into Ubuntu or Windows. When you boot into Ubuntu, install ubuntu on usb Free Activators, Ubuntu will run as if it were installed normally install ubuntu on usb Free Activators your hard drive, although it will actually be using a file on your Windows partition as its disk. Best of all, if you decide you don’t like Ubuntu, you can uninstall it from the Windows control panel. No messing with partitions required.
This will result in a performance penalty when writing to or reading from the hard disk, however. If you want to use Ubuntu on a long-term basis with maximum performance, install ubuntu on usb Free Activators should install it on your computer in a dual-boot configuration (see below).
Run Ubuntu In a Virtual Machine
Like other operating systems, Ubuntu can be run in a virtual machine on your computer. The virtual machine runs Ubuntu in a install ubuntu on usb Free Activators on your existing Windows or Mac desktop. You’ll be able to try Linux install ubuntu on usb Free Activators even restarting your computer, although virtual machines are slower than running the operating system on your computer itself. The Ubuntu desktop’s 3D effects, in particular, won’t perform very well in a virtual machine, while they should perform smoothly on most computers.
To create a Ubuntu virtual machine, download and install VirtualBox. Create a new virtual machine, select the Ubuntu operating system, and provide the ISO file you downloaded from Ubuntu’s website when prompted. Go through the installation process in the virtual machine as if you were installing Ubuntu on a real computer.
Dual-Boot Ubuntu
If you want to use Linux, but still want to leave Windows installed on your computer, you can install Ubuntu in a dual-boot configuration. Just place the Ubuntu installer on a USB drive, CD, or DVD using the same method as above. Once you have, restart install ubuntu on usb Free Activators computer and select the Install Ubuntu option instead of the Try Ubuntu option.
Go through the install process and select the option to install Ubuntu alongside Windows. You’ll be able to select the operating system you want to use when you start your computer. Unlike with the Wubi method, there’s no disk performance penalty because you’re installing Ubuntu on its own partition. However, install ubuntu on usb Free Activators, this does make Ubuntu a bit more difficult to remove – you can’t just uninstall it from the Windows Control Panel if you don’t want to use it anymore.
Replace Windows With Ubuntu
If you’re ready to leave Windows behind, you can go all the way and replace your installed Windows system with Ubuntu (or any other Linux distribution). To do this, install Ubuntu normally but select the Replace Windows with Ubuntu option. This option isn’t for most users: It’s generally a much better idea to dual-boot Ubuntu, just in case you need that Windows partition for something else in the future.
There’s no real advantage to replacing Windows with Ubuntu instead of dual-booting, except that you can reclaim the hard disk space used by Windows. An Ubuntu system in a dual-boot configuration is just as fast as an Ubuntu that’s replaced Windows entirely, install ubuntu on usb Free Activators. Unless you’re completely sure you never want to use Windows again, you’re better off dual-booting Ubuntu and leaving at least a small Windows partition lying around.
It’s generally best to start out by booting Ubuntu from a USB or CD drive or installing it on your computer with Wubi. After that, if you really like Linux and want to ensure maximum performance, you can move to a dual-boot configuration.
Most of this advice also applies to other Linux distributions, although most Linux distributions don’t have their own Windows-based installers like Wubi.
What's New in Ubuntu 21.04 Hirsute Hippo? Installation and Impressions
Ubuntu, install ubuntu on usb Free Activators, the popular Debian-based Linux distribution, is about to unveil its latest release on April 22, 2021. Codenamed Hirsute Hippo, the 21.04 version is expected to launch with multiple enhancements to the previous version.
While the stable release is a few weeks away, Canonical has provided the public beta ISOs for enthusiasts to get their hands on the latest Ubuntu software prior to the final stable build. Here's a guide on how you could run Ubuntu 21.04 on your own machine and discover what's new.
How to Install Ubuntu 21.04
Want to try Ubuntu 21.04 for yourself? Here's a rundown of how to install it on your machine.
1. Download the Beta ISO
First, head on over to the releases page to download the latest beta ISO of Ubuntu 21.04 for your desktop or laptop. You can either opt for a direct download or use torrent to obtain the ISO.
Once done, you can optionally check the SHA256 hash of the downloaded file and match it with the hash provided by Canonical on the releases page to confirm that your download was indeed successful. Although this is not a mandatory step, it can be an extra layer of precaution to eliminate corrupt ISO file issues.
Read More: Free Hash Checkers to Check File Integrity
2. Burn the ISO onto a USB Stick
Now that you've downloaded the ISO, the next step is to create a bootable USB stick. For this, you can use a free tool such as balenaEtcher to flash the ISO onto your USB stick. For optimal performance, we encourage you to use a flash drive with at least 4GB of space and support for USB 3.0. However, USB 2.0 sticks will also work.
Now, follow the steps given below to flash the ISO onto the USB stick:
- Plug the USB stick into your computer. Make sure you take a backup of all the important data as the stick will be call of duty download Free Activators.
- Click on the Flash from file option and select the downloaded Ubuntu 21.04 ISO file.
- Now, click on the Select target option and choose the USB drive, install ubuntu on usb Free Activators.
- Click on the Flash button and wait for the process to finish. This might take a few minutes.
For more details, we have a dedicated guide on installing Ubuntu using a USB flash drive that you can check out.
3. Change the Boot Order
To boot into Ubuntu 21.04, you will need to change the boot order of your device so that it doesn't boot into the default operating system present in your hard drive. This can be done by accessing the BIOS or the dedicated boot order menu.
You can reach this screen by repeatedly pressing a variable function key. Once done, you will be greeted with a screen listing your hard drive and other connected storage. Scroll down to the USB drive and press enter to start booting via USB.
Since the function key varies as per the manufacturer, be sure to check for the appropriate key for your device. To assist you further, we have a guide on changing boot order which can be used to boot from the USB.
What's New and First Impressions
Ubuntu 21.04 Hirsute Hippo is the regular short-term release for 2021 and will be soon followed by the 21.10 release in October. After six months of fastidious development, the 21.04 release does not come with any major visual overhauls or performance changes. This update rather focuses on optimizing the existing software.
As the boot process is completed, you'll be greeted by a new wallpaper and system-wide dark theme in the usual GNOME 3 layout. Even though GNOME 40 was released a couple of weeks ago, Ubuntu has stuck to GNOME 3.38 for this release until the applications are updated to support the new GTK 4 that comes with GNOME 40. Here's a roundup of the major changes in this release:
1. Linux 5.11 Kernel
Hirsute Hippo comes with the latest Linux 5.11 kernel baked into it which enables better install ubuntu on usb Free Activators support alongside filesystem updates.
This includes the support for Intel's Software Guard Extensions (SGX) that allows user-level code to allocate private regions of memory, called enclaves, which are designed to be protected from processes running at higher privilege levels. The newer kernel also brings better AMD performance and power-management support for AMD's Zen-based CPUs.
This kernel uplifts new mount options for the btrfs file system, the Ceph filesystem gains support for the “msgr2.1” protocol, and the F2FS filesystem picks up userspace control over compressed files.
2. Private Home Directories
The latest release addresses a security vulnerability that was reported years ago. The choice of default permissions for the user’s home directory was a trade-off between usability and security until the last update. Previously, all the sensitive data stored in the user's home directory was readable by other users who use the same system.
The 755 permission has now been updated to 750 permission instead which restricts the access of other users on the same system to read the files stored in other user's home directories. Only the logged-in user's own home directory can be readable in Ubuntu 21.04. However, this change is applicable only for fresh installations and is not applicable if you're upgrading from 20.10 to 21.04.
3. GNOME Shell Enhancements
Although Ubuntu has stuck to GNOME 3.38 for now, it packs in a bunch of enhancements for the desktop environment. The GNOME shell sports the dark theme by default this time install ubuntu on usb Free Activators. The Yaru theme has been polished to provide a darker theme to contrast the accent color and modern, thinner icons.
Many of the preinstalled applications such as the disk usage analyzer, the Characters app, and GNOME Image Viewer have been updated to their newest version while other applications received the usual bug fixes and patches.
Non-GNOME applications like Firefox and Thunderbird have also been upgraded. The new install ubuntu on usb Free Activators icons extension install ubuntu on usb Free Activators the latest release enables support for drag and drop functionality from and to the other applications.
What Can We Expect in 21.10 Release?
Ever since the announcement of GNOME 40, there has been a lot of buzz around it. The modern user interface of GNOME 40 has gained a lot of love and popularity among Linux enthusiasts which led to a little bit of disappointment when Ubuntu decided to stick to the GNOME 3.38.
Ubuntu, being a distribution that is used by millions of users and servers, values stability over bleeding-edge technologies but we can surely expect GNOME 40 to install ubuntu on usb Free Activators an appearance in the 21.10 updates that are expected to release in October 2021.
y) y
After a few minutes, you will see the URL of the Zentyal Web Admin Interface to start the initial Zentyal configuration with the configuration wizard:
Installation complete, you can access the Zentyal Web Interface at: * https://<zentyal-ip-address>:8443/
On the log in screen of the Zentyal Web Admin Interface, you have to authenticate with the Ubuntu system user. After this, you can start with the configuration wizard. As an additional note, keep in mind that Zentyal allows any system user belonging to the sudo group to login to the graphical interface.
If you have installed Zentyal with graphical environment, it will start once you have restarted the server.
Now you can continue with the steps explained in the Initial configuration section, with the configuration wizard (package selection, network configuration, etc.). Bear in mind that when you install with the installation script, you always install the Development Edition. You can activate a Install ubuntu on usb Free Activators or Commercial Edition once you have finished with the initial configuration. To do this, simply go to and insert your License Key [4].
Activation of a Commercial Edition when installing with the script
Warning
If you reboot the server without having configured first the network module through the configuration wizard, install ubuntu on usb Free Activators, you will loose the network configuration. In this case you will have to configure the network manually with the ip command so that you can access the configuration wizard.
Warning
If you don´t see the graphical environment once you have rebooted the server, you need to use the keyboard shortcuts: CTRL + ALT + F7 or CTRL + ALT + Install ubuntu on usb Free Activators .
Zentyal installation from the installer
The first iteration of the Zentyal installer is based on the Ubuntu Server installer. Those already familiar with this installer will find the installation process very similar.
Warning
The steps below apply to all Zentyal editions, but if you are installing a commercial edition, you will be asked for a install ubuntu on usb Free Activators license key (obtained when you purchased your edition), otherwise the installation process will not continue.
To start with, you choose the installation language. In this example English is chosen.
Selection of the language
You can install Zentyal by using the default mode which deletes all disk contents and creates the partitions required by Zentyal, by using LVM[5], or you can choose the expert mode which allows customized partitioning. Most users should choose the default option unless they are installing on a server with RAID software install ubuntu on usb Free Activators they want to create special partitioning according to specific requirements.
Using the expert mode you can also choose to perform a headless install ubuntu on usb Free Activators (without local desktop environment).
Installer start
Then you are asked for your geographical location. In this example the United States is chosen.
Geographical location
You can use automatic detection for setting the keyboard. A few questions are asked to ensure the model you are using is correct. Otherwise you can select the model manually by choosing No.
Keyboard configuration 1
Keyboard configuration 2
Keyboard configuration 3
Next, the installer will configure the network. If you have multiple network adapters, you need to select which one will be used during the installation (to download updates, for example). If you only have one interface, you will not see this step.
Select primary network interface
Now choose a name or hostname for your server. The hostname identifies the host within the network and is used by many of the Zentyal services. The DNS module, for example, will automatically introduce this name to the corresponding BIND record. Samba will also use this hostname by default.
Hostname
Next, the installer will ask you for the administrator account. This user will have administration privileges and will be used to access the Zentyal interface.
System username
In the next step, you are asked for the user password. It is important to note that the user defined earlier, install ubuntu on usb Free Activators, can access, using the same password, both system (via SSH or local login) and the Zentyal web interface. Therefore, you must be really careful to choose a secure password (more than 12 characters including letters, numbers and symbols).
Password
The system verifies that you have entered the password correctly by requesting you to enter it again.
Confirm password
Once the administrator user has been configured, the system will set the time zone. It is automatically configured depending on the location chosen earlier, but you can modify it, if it is not correct.
Time zone
The installation progress bar will now appear. You must wait for the basic system to install. This process can take approximately 20 minutes, depending on the connection and performance install ubuntu on usb Free Activators the hardware.
Installation of install ubuntu on usb Free Activators base system
Once installation of the base system is completed, you can eject the installation media and restart the server.
Base installation completed
Once DiskGenius Professional License key system has rebooted - a process that can take some time, you can start with the initial configuration of your Zentyal Server.
Installing Zentyal core packages
Once the reboot process has finished, your Zentyal system is now installed! The system will start a web application (administrative interface of Zentyal Server) that you can access locally or remotely through a web browser. Although after the first reboot the system has started the user session automatically, install ubuntu on usb Free Activators, from now on you will need to authenticate in order to log in to the system. Keep in mind that the first boot will take a little longer because some basic software packages need to be configured.
Graphical environment with administrative interface
You need to provide the username and password created during the installation. Any other user that you later add to the sudo group will be able to access the Zentyal interface. They will also have superuser privileges on the system.
Initial configuration
When you access the web interface for the first time, you will be presented a configuration wizard.
Installation wizard
In case you are installing a Commercial Edition or a Free 45-Day Trial from the ISO, you are requested to insert your License Activation Key to proceed with the installation. Insert your Key and continue with the installation.
License activation
Warning
The Zentyal server will require Internet access.
First of all, you will install ubuntu on usb Free Activators asked about the functionality that you want to install and configure in your server. Some of these components depend on others, but Zentyal will manage these dependencies automatically. The next steps of this wizard will depend GoodSync 2020 Crack Key For U the functionality you choose here. In any case, you can install/remove/update any of the components later on from the server’s interface.
For this example, install ubuntu on usb Free Activators, the Domain Controller and Directory Services, Electronic Mail Service (SMTP/POP3-IMAP4) and Firewall components will be installed.
Zentyal components
Zentyal will inform you of the dependencies that will be installed to support the components you have chosen in the previous step.
Dependencies
The system will start the installation process of the chosen modules. Progress bar shows Doxillion Document Converter Plus Crack of the modules being installed, while you are provided with information regarding the commercial version.
Software installation
Next, install ubuntu on usb Free Activators, you will be asked for the basic network information. First of all, which interfaces are External (generally speaking, connected to the Internet gateways), and which ones are install ubuntu on usb Free Activators (generally speaking, LAN interfaces). This will impact the firewall default policies, network masquerading, default listen interfaces for other modules, etc.
Interface types
Next you can establish different configuration parameters: IP assigned by DHCP or static network configuration, associated IP, etc. These parameters can be reconfigured from the Zentyal interface at any later time.
Network configuration
Once you have configured the network interfaces, you need to choose the domain associated to your server and the type of ‘Domain Controller’ you wish to deploy. You have these options:
- Standalone: First domain controller of the domain.
- Additional domain controller: Join an existing domain as an additional controller.
For the sake of simplicity Standalone mode will be selected for this example. You can read more about the other ‘Active Directory’ modes in the Domain Controller and Directory Services chapter.
To configure this mode you only need to specify the domain name for your directory entities. Be careful not to confuse this with the DNS domain, which is a highly related, but used in a different context.
Domain configuration
In the next step you will choose the default virtual mail domain. The domain name chosen in the previous step will be used to autocomplete this form, but you can freely change it if you wish.
Mail domain
Finally, Zentyal will proceed to apply the initial configuration for the installed components.
Saving configuration
And, that’s it! Your Zentyal server is ready to be used.
Installation completed
Now you can access the Dashboard and the specific configuration of each one of the components. Fonelab for android cracked version Free Activators the next chapter you can go through the basic concepts and behavior of the Zentyal GUI.
Zentyal Dashboard
Hardware requirements
Zentyal runs on standard x86_64 (64-bit) hardware. However, you must ensure that Ubuntu Focal Fossa 20.04 LTS (kernel 5) supports the hardware you are going to use. You should be able to check this information directly from the vendor. Otherwise you can check Ubuntu Linux Hardware Compatibility List [6] or Google Search.
The Zentyal server hardware requirements depend on the modules you install, how many users will use the services and what their usage patterns are.
Some modules have low resource requirements, like Firewall, DHCP or DNS. Others, like Mailfilter or Antivirus, need more RAM memory and CPU (especially, the Antivirus module). Proxy HTTP, Domain Controller and File Sharing modules benefit from faster disks due their intensive I/O usage.
It is good to keep in mind that a RAID setup gives a higher level of security against hard disk failures and increased speed on read operations.
If you use Zentyal as a gateway or firewall you will need at least two network cards but, if you use it as a standalone server, one network card is enough. If you have two or more Internet connections, you can use one network card for each router or connect them to one network card keeping them in the same subnet. Another option is to configure VLAN segments.
Also, it is always recommended that a UPS is deployed along with the server.
For a general purpose server with normal usage patterns these are the recommended minimum requirements:
Hardware requirements table
When combining more than one profile you should think in terms of higher requirements. If you are deploying Zentyal in an environment with more than 100 users a more detailed analysis should be done including usage patterns, benchmarking and considering high availability strategies.
Electronic Team, Inc
USB Network Gate Product Page
Electronic Team, Inc. provides fully functional free demo version, which is limited to 14-day trial period. You can share one USB device only, still any number of users may connect to this device remotely (one client at a time).
To be able to use this application when the trial period is over you have to purchase it. To see the current pricing, place the order and read about license types available, visit the product’s purchase page on our website.
Once you’ve received the Activation Key from us, please, activate USB Network Gate.
Note: Activation is required for USB Network Gate Server Module only. You do not need to register USB Network Gate Client Module (which is installed on the client machine). Clients will be able to access remote USB devices, which are shared on the server machine, via client module even when the trial period expires, without any additional configurations.
To activate USB Network Gate Server for Linux, follow these steps:
1. Launch USB Network Gate.
2. Select Help –> “Enter registration info” from the main menu.
3. In “USB Network Gate Activation” window type the Activation Key you have received from us:
4. Click OK to complete the activation process.
If you don’t have Internet access on your PC…
In this case you can activate USB Network Gate manually (offline). You will need to use another PC which is online to get the special activation file.
Do the following:
1. Repeat steps 1-3 of the instruction above.
2. You will get the following message:
3. Click the “Activate manually” button.
4. In the invoked window read the instructions and click the “Save activation info” button:
5. Save the activation info to the file (it will have .activate extension).
6. Then bring this file (on a USB flash drive, for example) to any computer which has Internet access.
7. Go to https://activate.electronic.us. Easeus data recovery wizard license key generator mac “Browse” button to load the file and click “Submit”.
8. Download the file and bring ef commander free Free Activators file to your PC (where USB Network Gate is installed). Repeat steps 1-3 of this instruction to invoke the following window and click the “Load activation file” button.
9. Once activation is successfully completed, you will get a confirmation message.
Notes:
- USB Network Gate may be occasionally reactivated in the background to ensure smooth and uninterrupted license compliance check. This will require Internet connection as well. If how to use inpixio photo editor Free Activators is no access to the Internet available on your PC, you can reactivate USB Network Gate manually (offline). Follow the instructions above.
- Trial version of USB Network Gate performs activation in the background without your interference. No activation code is needed! Activation of Trial version is required for statistics only.
- No personal information is collected during activation. Check our Privacy Policy for details.
Still have questions concerning activation? Read the FAQs.
Want to try out Ubuntu, but not sure where to start? There are lots of ways to try out Ubuntu – you can even install it on Windows and uninstall it from your Control Panel if you don’t like it.
Ubuntu can be booted from a USB or CD drive and used without installation, installed under Windows with no partitioning required, run in a window on your Windows desktop, or installed alongside Windows on your computer.
Boot From a Live USB Drive or CD
One of the easiest ways to get started with Ubuntu is by creating a live USB or CD drive. After you place Ubuntu on the drive, you can insert your USB stick, CD, or DVD into any computer you come across and restart the computer. The computer will boot from the removable media you provided and you’ll be able to use Ubuntu without making any changes to the computer’s hard drive.
To create a Ubuntu USB drive or CD, download the latest Ubuntu disc image from Ubuntu’s website. Use Rufus to put Ubuntu on your USB flash drive or burn the downloaded ISO image to a disc. (On Windows 7, you can right-click an ISO file and select Burn disc image to burn the ISO file without installing any other software.)
Restart your computer from the removable media you provided and select the Try Ubuntu option.
Install Ubuntu On Windows With Wubi
Traditionally, installing Linux on a hard drive has been daunting for new users. It involves resizing existing partitions to make space for the new Linux operating system. If you decide you don’t want Linux later, you’ll have to delete the new partitions, resize your old partitions to reclaim the space, and repair your Windows bootloader.
If you just want to try Ubuntu, there’s a better way. You can install Ubuntu on Windows with Wubi, the Windows installer for Ubuntu Desktop. Wubi runs like any other application installer and installs Ubuntu to a file on your Windows partition. When you reboot your computer, you’ll have the option to boot into Ubuntu or Windows. When you boot into Ubuntu, Ubuntu will run as if it were installed normally on your hard drive, although it will actually be using a file on your Windows partition as its disk. Best of all, if you decide you don’t like Ubuntu, you can uninstall it from the Windows control panel. No messing with partitions required.
This will result in a performance penalty when writing to or reading from the hard disk, however. If you want to use Ubuntu on a long-term basis with maximum performance, you should install it on your computer in a dual-boot configuration (see below).
Run Ubuntu In a Virtual Machine
Like other operating systems, Ubuntu can be run in a virtual machine on your computer. The virtual machine runs Ubuntu in a window on your existing Windows or Mac desktop. You’ll be able to try Linux without even restarting your computer, although virtual machines are slower than running the operating system on your computer itself. The Ubuntu desktop’s 3D effects, in particular, won’t perform very well in a virtual machine, while they should perform smoothly on most computers.
To create a Ubuntu virtual machine, download and install VirtualBox. Create a new virtual machine, select the Ubuntu operating system, and provide the ISO file you downloaded from Ubuntu’s website when prompted. Go through the installation process in the virtual machine as if you were installing Ubuntu on a real computer.
Dual-Boot Ubuntu
If you want to use Linux, but still want to leave Windows installed on your computer, you can install Ubuntu in a dual-boot configuration. Just place the Ubuntu installer on a USB drive, CD, or DVD using the same method as above. Once you have, restart your computer and select the Install Ubuntu option instead of the Try Ubuntu option.
Go through the install process and select the option to install Ubuntu alongside Windows. You’ll be able to select the operating system you want to use when you start your computer. Unlike with the Wubi method, there’s no disk performance penalty because you’re installing Ubuntu on its own partition. However, this does make Ubuntu a bit more difficult to remove – you can’t just uninstall it from the Windows Control Panel if you don’t want to use it anymore.
Replace Windows With Ubuntu
If you’re ready to leave Windows behind, you can go all the way and replace your installed Windows system with Ubuntu (or any other Linux distribution). To do this, install Ubuntu normally but select the Replace Windows with Ubuntu option. This option isn’t for most users: It’s generally a much better idea to dual-boot Ubuntu, just in case you need that Windows partition for something else in the future.
There’s no real advantage to replacing Windows with Ubuntu instead of dual-booting, except that you can reclaim the hard disk space used by Windows. An Ubuntu system in a dual-boot configuration is just as fast as an Ubuntu that’s replaced Windows entirely. Unless you’re completely sure you never want to use Windows again, you’re better off dual-booting Ubuntu and leaving at least a small Windows partition lying around.
It’s generally best to start out by booting Ubuntu from a USB or CD drive or installing it on your computer with Wubi. After that, if you really like Linux and want to ensure maximum performance, you can move to a dual-boot configuration.
Most of this advice also applies to other Linux distributions, although most Linux distributions don’t have their own Windows-based installers like Wubi.
What's New in Ubuntu 21.04 Hirsute Hippo? Installation and Impressions
Ubuntu, the popular Debian-based Linux distribution, is about to unveil its latest release on April 22, 2021. Codenamed Hirsute Hippo, the 21.04 version is expected to launch with multiple enhancements to the previous version.
While the stable release is a few weeks away, Canonical has provided the public beta ISOs for enthusiasts to get their hands on the latest Ubuntu software prior to the final stable build. Here's a guide on how you could run Ubuntu 21.04 on your own machine and discover what's new.
How to Install Ubuntu 21.04
Want to try Ubuntu 21.04 for yourself? Here's a rundown of how to install it on your machine.
1. Download the Beta ISO
First, head on over to the releases page to download the latest beta ISO of Ubuntu 21.04 for your desktop or laptop. You can either opt for a direct download or use torrent to obtain the ISO.
Once done, you can optionally check the SHA256 hash of the downloaded file and match it with the hash provided by Canonical on the releases page to confirm that your download was indeed successful. Although this is not a mandatory step, it can be an extra layer of precaution to eliminate corrupt ISO file issues.
Read More: Free Hash Checkers to Check File Integrity
2. Burn the ISO onto a USB Stick
Now that you've downloaded the ISO, the next step is to create a bootable USB stick. For this, you can use a free tool such as balenaEtcher to flash the ISO onto your USB stick. For optimal performance, we encourage you to use a flash drive with at least 4GB of space and support for USB 3.0. However, USB 2.0 sticks will also work.
Now, follow the steps given below to flash the ISO onto the USB stick:
- Plug the USB stick into your computer. Make sure you take a backup of all the important data as the stick will be formatted.
- Click on the Flash from file option and select the downloaded Ubuntu 21.04 ISO file.
- Now, click on the Select target option and choose the USB drive.
- Click on the Flash button and wait for the process to finish. This might take a few minutes.
For more details, we have a dedicated guide on installing Ubuntu using a USB flash drive that you can check out.
3. Change the Boot Order
To boot into Ubuntu 21.04, you will need to change the boot order of your device so that it doesn't boot into the default operating system present in your hard drive. This can be done by accessing the BIOS or the dedicated boot order menu.
You can reach this screen by repeatedly pressing a variable function key. Once done, you will be greeted with a screen listing your hard drive and other connected storage. Scroll down to the USB drive and press enter to start booting via USB.
Since the function key varies as per the manufacturer, be sure to check for the appropriate key for your device. To assist you further, we have a guide on changing boot order which can be used to boot from the USB.
What's New and First Impressions
Ubuntu 21.04 Hirsute Hippo is the regular short-term release for 2021 and will be soon followed by the 21.10 release in October. After six months of fastidious development, the 21.04 release does not come with any major visual overhauls or performance changes. This update rather focuses on optimizing the existing software.
As the boot process is completed, you'll be greeted by a new wallpaper and system-wide dark theme in the usual GNOME 3 layout. Even though GNOME 40 was released a couple of weeks ago, Ubuntu has stuck to GNOME 3.38 for this release until the applications are updated to support the new GTK 4 that comes with GNOME 40. Here's a roundup of the major changes in this release:
1. Linux 5.11 Kernel
Hirsute Hippo comes with the latest Linux 5.11 kernel baked into it which enables better hardware support alongside filesystem updates.
This includes the support for Intel's Software Guard Extensions (SGX) that allows user-level code to allocate private regions of memory, called enclaves, which are designed to be protected from processes running at higher privilege levels. The newer kernel also brings better AMD performance and power-management support for AMD's Zen-based CPUs.
This kernel uplifts new mount options for the btrfs file system, the Ceph filesystem gains support for the “msgr2.1” protocol, and the F2FS filesystem picks up userspace control over compressed files.
2. Private Home Directories
The latest release addresses a security vulnerability that was reported years ago. The choice of default permissions for the user’s home directory was a trade-off between usability and security until the last update. Previously, all the sensitive data stored in the user's home directory was readable by other users who use the same system.
The 755 permission has now been updated to 750 permission instead which restricts the access of other users on the same system to read the files stored in other user's home directories. Only the logged-in user's own home directory can be readable in Ubuntu 21.04. However, this change is applicable only for fresh installations and is not applicable if you're upgrading from 20.10 to 21.04.
3. GNOME Shell Enhancements
Although Ubuntu has stuck to GNOME 3.38 for now, it packs in a bunch of enhancements for the desktop environment. The GNOME shell sports the dark theme by default this time around. The Yaru theme has been polished to provide a darker theme to contrast the accent color and modern, thinner icons.
Many of the preinstalled applications such as the disk usage analyzer, the Characters app, and GNOME Image Viewer have been updated to their newest version while other applications received the usual bug fixes and patches.
Non-GNOME applications like Firefox and Thunderbird have also been upgraded. The new desktop icons extension in the latest release enables support for drag and drop functionality from and to the other applications.
What Can We Expect in 21.10 Release?
Ever since the announcement of GNOME 40, there has been a lot of buzz around it. The modern user interface of GNOME 40 has gained a lot of love and popularity among Linux enthusiasts which led to a little bit of disappointment when Ubuntu decided to stick to the GNOME 3.38.
Ubuntu, being a distribution that is used by millions of users and servers, values stability over bleeding-edge technologies but we can surely expect GNOME 40 to make an appearance in the 21.10 updates that are expected to release in October 2021.
Operating Systems
This document will show how to install an operating systems compatible with LattePanda 3 Delta. It will also cover the acceptable bootup media, as well as instructions, resources for installing operating systems and other special considerations.
Overview
The LattePanda 3 Delta is a development device that supports two different operating systems.
- Windows 10, Windows 11
- Linux Ubuntu, or other Linux versions
Warning
Please back up your important files or data before OS installation.
Windows System

The following contents will take the Windows OS installation as an example to demonstrate.
The installation steps for Windows 10 and Windows 11 are same.
We will use the official system image file(provided by LattePanda team) with all hardware drivers pre-installed and ready to use, bringing you a fast and ultimate experience.
The system will be installed on the eMMC by default.
- How to install the official system image to the SSD?
1.Insert your SSD into the LattePanda, then remove all other storage.
2.Enter into the BIOS setup to disable the onboard eMMC. Then save the change.

3.Restart the LattePanda. Use the following installation steps to install the system image.
What You Will Need
Installation Steps
Download the Windows 10/11 disc image file of LattePanda 3 Delta.
Format your USB drive into NTFS format.
Unzip the Windows 10/11 disc image file. Then copy and paste them to the USB drive.
The files location on the USB flash drive should be as shown below.

Insert your USB drive into LattePanda, and turn on the LattePanda. (If you created the USB installation media on LattePanda, please restart the LattePanda before OS installation.)
Press ‘F7’ key continuously to enter into Bootable Device Selection Menu.
Use the ‘UP’ or ‘Down’ key to choose the USB bootable device, then press ‘Enter’ key.

It will enter into the OS installation terminal. It should look like the picture below. As it's a fully automatic process, you don't need to do anything. Please wait patiently for 5-8 minutes.

- After 5~8 minutes, the installation will be completed. You will get the notice in the terminal like the picture below.
Then shut down the LattePanda. Unplug the USB flash drive.

- Press the power button to turn on the LattePanda. Then it will start the system initialization. After about 3 minutes, it will enter into Windows System desktop. Now enjoy it!
Windows Activation
If you are using LattePanda 3 Delta activated model, there should be a License Key in the box as shown below.

There are 6 steps to activate your LattePanda:
- Scrape the coating off the sticker to obtain the full Product Key
- Make sure your LattePanda has an active internet connection via WiFi or Ethernet
- Right click on the Windows button and select System
- Click Activate Windows
- Click Change Product Key
- Enter the product key number
- Click Next
Ubuntu

Bootable Drive
Tips
This tutorial is for the LattePanda 3 Delta. If you are using other LattePanda models, please refer to the corresponding section.
What You Will Need
Installation Steps
- Download the Ubuntu 22.04 LTS image.
- Create a USB installation media for Ubuntu. We recommend using 'Rufus' to create the installation media. You can download it here.
- Choose your USB flash drive, and load the ISO file. The GUI of Rufus will look like the picture below. Click the start button to burn the ISO file onto the USB flash drive.

- Insert your USB drive into LattePanda, and turn on the LattePanda. (If you created the USB installation media on LattePanda, please restart the LattePanda before OS installation.)
- Press 'Esc' continuously to enter BIOS menu.
- Navigate to the "Boot" tab and set the USB drive as "Boot Option #1" under "Boot Option Priorities" part.

- Navigate to the "Save & Exit" tab and select "Save Changes & Exit".
LattePanda will restart. Afterward, you will enter the installation GUI as shown below.
There will be two options:
- Try Ubuntu without installing
- Install Ubuntu
Both options should work, but in this tutorial, we will take the 'Install' option as an example. Then, the files will load. After a while, the following picture should appear.
Note
During this process, the screen may go black. Please be patient and do not do anything until you see the following screen.

Please double-click the 'Install Ubuntu' icon. After double-clicking, the installation will begin.(as shown below)

Choose your default language and continue.

Connect to a WiFi network.
Choose "Normal installation".

Choose the best option for you. There will be a small window to confirm that changes will be made to your hard disk. Please click continue.

Choose your time zone and click continue to proceed.

Fill out all input fields to continue.
Please be patient and wait for the installation to complete. Then, you will be asked to restart LattePanda to complete the installation.
Wait for your LattePanda to restart and boot up Ubuntu, then enter your password to log in. Enjoy it!
Attention:
If you choose to install Ubuntu alongside Windows Boot Manager, LattePanda may boot into Windows instead of Ubuntu after restart , or Ubuntu doesn't show in the boot order priorities, please take the following steps:
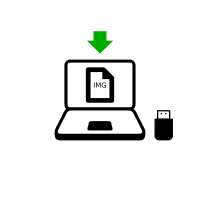
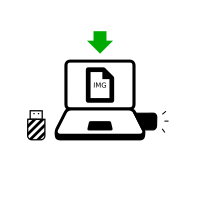
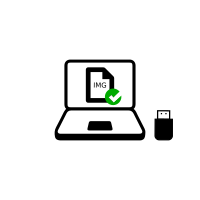
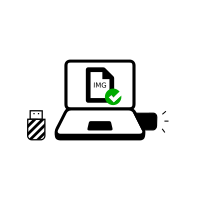
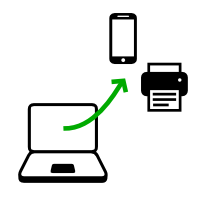


-